Hemi Twin Turbo Outlaw 10.5 Shelby build
+39
schmitty
badsnake306
austin460
powerstrokeace
gordyd4
61coon
cletus66
5pointslow
supervel45
kim
Mike R
bronco911
70FB
D-CEL
Doug Rahn
512Fairlane
TravisRice
John Myrick
D's557BBF
Tony M
nuclearcobra
richter69
Jim Brown
dfree383
Tennessee Bullitt
jbozzelle
yellowhorse7
bigblok2000ranger
badcoupe
c.evans
psfracer
BOSS 429
cool40
D. Sea
whatbumper
Curt
jasonf
bruno
rodfarva
43 posters
Page 1 of 7
Page 1 of 7 • 1, 2, 3, 4, 5, 6, 7 
 Hemi Twin Turbo Outlaw 10.5 Shelby build
I'm in the process of building an Outlaw 10.5 car out of my 2010 Shelby GT500. This winter, the car will be going to the chassis shop for a back half, 4-link, and 25.2 chassis. I was initially gonna stay with the modular motor platform, but have since decided that doing so will likely be more costly and will seriously hinder my ability to be competitive.
I was initially planning on doing a 550 cid build with Eliminator Premier block and Blue Thunder Thor heads, but I have stumbled across another motor for a good price that I am considering.
It is a:
604 cid
AR aluminum block with 11.200" deck height and front gear drive/mag drive
4.50" bore
4.75" stroke
Bryant billet crank
AR Hemi heads
2.40" titanium intake valves and 1.90" titanium exhaust valves
Brooks aluminum rods
Arias pistons yielding 11.7:1 comp ratio
dry sump oiling system
I'm gonna likely run twin 88mm turbos from Precision. The fuel will be alcohol. It will be EFI controlled by Big Stuff 3. I'm planning on using a crank trigger and MSD Pro Mag 44 for the ignition system. The tranny will be a Powerglide.
I'm would like switch out the exhaust valves to Inconel, as I'm not sure that the titanium exhaust valves could withstand the heat generated by the turbo setup, particularly preceding the launch when timing is retarded to help the turbos spool faster.
Last edited by rodfarva on December 17th 2011, 10:13 am; edited 1 time in total
 Re: Hemi Twin Turbo Outlaw 10.5 Shelby build
have you looked at the Ferrera super alloy instead of the Inconel
_________________
coming soon x275 build .........
thanks to all my sponsors :
www.OakleyMotorsports.com
www.Induction-Solutions.com
www.bfevansraceparts.com
www.ultimateconverter.com
www.keithfulpmotorsports.com
 Re: Hemi Twin Turbo Outlaw 10.5 Shelby build
What did you do with the 5.4l Shelby motor?
jasonf- BBF CONTRIBUTOR

- Posts : 2994
Join date : 2009-07-14
Age : 55
Location : Lafayette, LA
 Re: Hemi Twin Turbo Outlaw 10.5 Shelby build
Sounds like the most interesting thing going on around here. 

Curt- Posts : 2791
Join date : 2009-02-08
Age : 62
Location : Henrietta, Texas but mostly on the road
 Re: Hemi Twin Turbo Outlaw 10.5 Shelby build
jasonf wrote:What did you do with the 5.4l Shelby motor?
I have two 5.4 rotating assemblies. One of them, will be going in an '01 Cobra. The other may be up for sale if I don't end up working it in as a partial trade on the hemi motor.
 Re: Hemi Twin Turbo Outlaw 10.5 Shelby build
Here a previous build thread that I posted on another forum previously
I had every intention of drag racing my car when I bought it. I think I had already pretty much picked out the Whipple 2.9 before I bought the car. My goal was to have a low 10 sec street/strip car. I distinctly remember picking the Whipple 2.9 because it would fit under the stock hood without k-member spacers, which I thought was just too much to do to a new car. Wow, how things change!!!
The Whipple 2.9 went on the car 3 weeks after driving the car home from the dealer. Charles Gordon of G.R.E.A.D. Tuning tuned the car, and it made 642 rwhp on a Mustang Dyno. I wanted more. After adding longtube headers, full 3" exhaust, a meth/water injection system, and a smaller blower pulley, the car was making over 750 rwhp and was running mid 6s in the 1/8 mile at the drag strip with the 6-speed tranny. Suddenly I found myself unwelcome at the drag strip until my car had a roll bar.
This is where the direction of the car started to turn drastically. I initially had a 6-point bar installed in the car that winter, and I was completely dissatisfied with it. Under my direct supervision, it was redone and morphed into a 10-point cage. While the interior was gutted, I started looking for ways to reduce the weight of car, as it was just too heavy. Gone were the stereo system, AC/heat, ABS, power brakes, power steering, factory seats, airbags, factory seatbelts, crash braces, mufflers, and many other small items. This paid off, as the new weight of the car after the cage was added with a 1/4 tank of fuel was 3320 pounds.
The car made it to the track once with this setup. What had worked the previous Fall, no longer worked. I made 2 bad passes and then the 3rd gear synchro in the transmission went out, before I could fully test this setup.
Not wanting to continue struggling with the 6-speed tranny, and having future plans of building a blistering fast twin-turbo car, I opted at this point for an auto swap. Luckily, there just happened to be a suitable tranny in another car in the shop--a Powerglide.
Back to the track we went, and were rewarded with a best of 6.35 @ 112 mph in the 1/8, but the car still wasn't getting off the line that well with dismal 60' times of 1.50. It was either bog or blow the tires off, but no happy medium. I had previously installed a nitrous system, but had yet to try it at the track--this might be the solution.
At this point, I noticed that Ford Racing had a built short block option with Manley H-beam rods for only $2850 shipped. Realizing that my factory bottom-end was living on borrowed time, I saw this as a great option for a temporary solution until I had the money to start the ultimate twin-turbo build. I was not keen on the low compression of 8:1 with that short block, and I managed to find another well-known vendor who would build a similiar short block with a compression ratio of 10:1.
The Whipple 2.9 was slated to go back on the car, until I learned about the upcoming GT500/Terminator Shootout. Even with the increased CR, this blower just didn't stand a chance of being competitive in that event. This is where the Whipple 4.0 came into the picture.
With the Shootout barely 3 months away, I knew that there was a lot of work to be done and little time to do it. I planned to have the car completed by late August so that we would have about a month to dial it in before Bowling Green. Unfortunately, everyone else seemed to have different plans. Cams were on a national backorder, machine shops took longer to do the work than they were supposed to, parts didn't come in on time or at all---nothing seemed to go my way.
Fast forward to Sept. 8. Everything was done and we were in the process of dyno tuning the car. The preliminary numbers looked promising, as we were seeing 920 rwhp at only 6100 rpm with pig rich AFRs and only 15 degrees of timing, and then...it happened. Both head gaskets blew, both heads were torched, and the crank keyway was sheared. It seemed that making it to NMRA would now be unlikely if not impossible.
It was now Wednesday Sept. 28. The fiance was threatening to leave me because of the amount of time that I was spending working on the car and I had another large machine shop bill to pay. We were still fighting EFI standalone gremlins and the car still hadn't been to the track. The car was blowing the tires off on the dyno and we destroyed a slick in the process of trying to tune it. The 13th hour had come and had passed.
We arrived in Bowling Green at 1pm on Thursday only to discover that there would be no Test and Tune that day as there had been in previous years. The car still wasn't completely tuned and needed some track time to get the tune nailed down. It would have to wait. We replaced the damaged slick and registered the car.
Friday, we made our 1st pass on the new setup. I had previously modified the rear bumper cover to allow for more tire clearance in the wheelwell for the larger 29.5 x 10.5" slicks. The bumper blew off around half track and tripped the battery disconnect lever in the process causing the car to shut down at around the 900 ft mark. We still clicked off a 9.34 @ 135 mph. Not too shabby considering the circumstances. On the 2nd pass, a vacuum line blew off yielding similar results. Test and Tune was now over and we made our first qualifying pass. We had just adjusted the shifter linkage and the car wouldn't shift into high gear. We achieved our best 60 ft of 1.39 and coasted to a spot of 2nd to last on the qualifying list.
It was now Saturday morning, and the 2nd round of qualifying was underway. The bumper and vacuum lines were secured and the shifter linkage had been readjusted and was functioning properly. Datalogs had been reviewed and the tune had been adjusted. We were still only running 17 degrees of total timing advance and the wideband gauges were still reading slightly rich. The launch looked good and the car went straight. A puff of gray erupted as the car went through the traps. The sign flashed 8.98 @ 175. While the mph seemed a tad fast, I was very pleased to see the 8 sec run on our first full 1/4 mile pass.
The radiator had been damaged when the head gaskets had blown 2 weeks prior and we had scrambled to repair it. It looked as if the radiator in tank had blown causing the spectacle at the end of the track. I continued to hope that the head gaskets were ok, but this hope ended as I refilled the coolant system and noted water to start pouring out of the exhaust. Apparently not even the Cometic MLS gaskets like 30 psi of boost and 10:1 compression. While our pass would have qualified us as 4th in the ladder, our weekend was over.
I'd like to say thanks to Charles Gordon and all the guys at G.R.E.A.D. Tuning in Corydon, IN for dyno time, tuning expertise, use of shop space and tools, and various other technical assistance. A big thanks to Mattingly Machine shop for getting the engine up and running again in such a short amount of time. I'd also like to thank Troy Cobb for his fabrication expertise and John Meaney for helping us to sort out the bugs in the BS3 standalone system. Also, thanks to DMotorsports for lending a hand to get the work done.

Whipple 2.9 configuration retaining all factory accessories

Just a very small portion of the factory wiring that was removed from the car. Eventually, all factory wiring was removed except what goes inside the doors, as it would require taking the doors off to remove it.

The factory fuseblocks and relays were replaced with several fuse blocks and relays such as these.

Before removal of rear package shelf/speaker deck

After removal of rear package shelf/speaker deck

From another angle showing after the removal of the rear package shelf/speaker deck
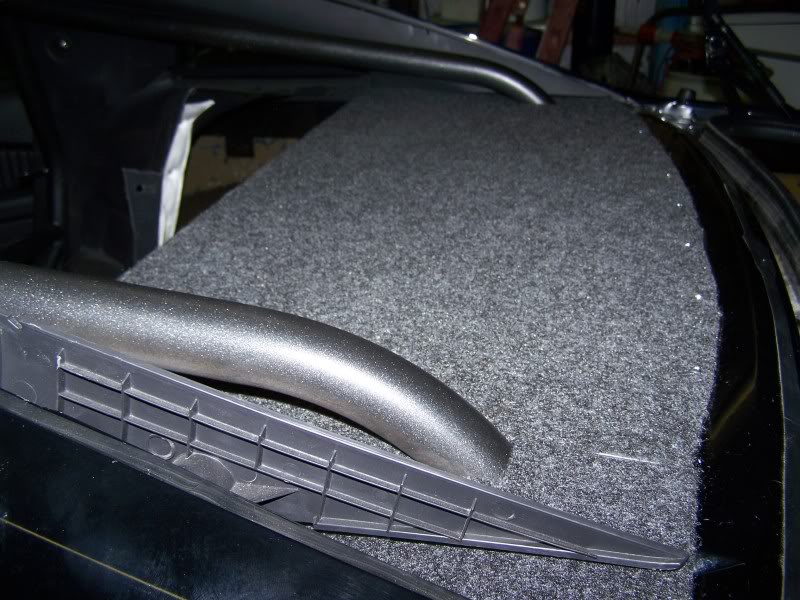
NHRA requires a rear firewall if a fuel cell is to be mounted in the trunk. It must constructed of aluminum no thinner than 0.032” or steel no thinner than 0.024”. I opted for aluminum. Here you can see it covered with trunk liner fabric.

Here is a shot of the rear firewall from another angle
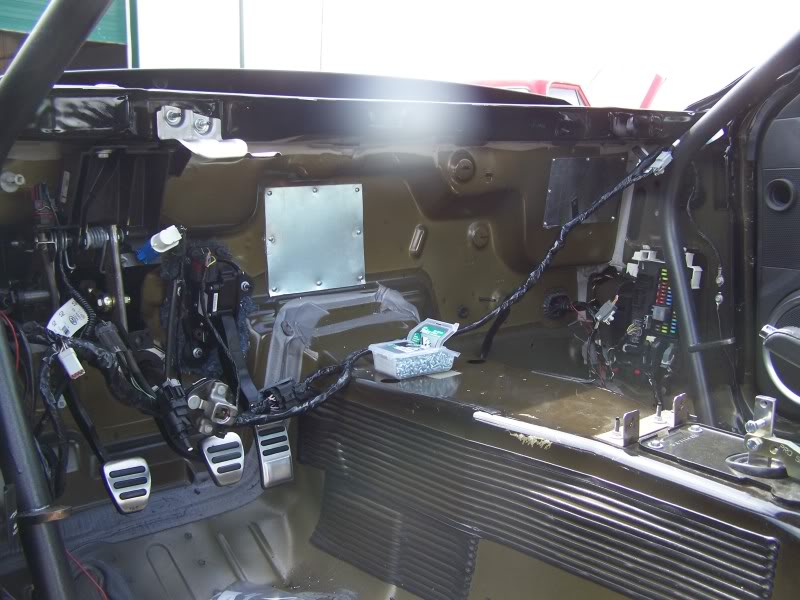
In this pic, you can see that the HVAC unit has been removed, and the holes have been blocked off with aluminum sheet metal. The cage has been installed. I considered removing the sound deadener that you see in this photo on the transmission tunnel, but it’s weight is so miniscule, it would have saved less than a pound total. I did remove some of the heavier sound deadener that was under the driver seat, and the “tar mat” sound deadener from within the doors.

The 10-point chrome moly cage has been installed and painted. This cage is NRHA legal to 8.50.

Another pic of the cage and interior after reassembly

A pic of the dash bar. I felt a little uneasy when cutting the dash

I opted to replace the driver seat with a Corbeau FX1 Pro seat with microsuede fabric. The Corbeau seat and bracket only weight about 24 pounds vs. the factory driver seat weight of ~60 pounds. The passenger seat weighed about 50 pounds and was also removed.

Here is a pic of the trunk after installation of the cage and rear firewall. Obviously, this is an older photo that was taken before installation of the fuel cell. The sealed battery box seen here is actually not required since I installed the firewall.

This Strange front brake setup saves about 40 pounds compared to the factory setup

I wanted my car to go fast, but I wanted to take most of the driver variable out of the equation. An automatic transmission would allow me to do this. Additionally, automatics tend to be easier to launch and are more forgiving to drivetrain parts. I opted to go with a 2-speed Powerglide, as we had available that was sitting in another car. Many people would argue that a 3-speed auto transmission would be a better choice, and this argument does have some merit. With a first gear ratio of 1.76 and a 2nd gear ratio of 1.00, a steeper rear gear is needed to help get the car out of the hole and to help diminish rpm drop after the shift. A steeper rear gear makes a rev-friendly motor a necessity, which led me to abandon my quest with the factory shortblock. Here you see the an OEM cased Powerglide
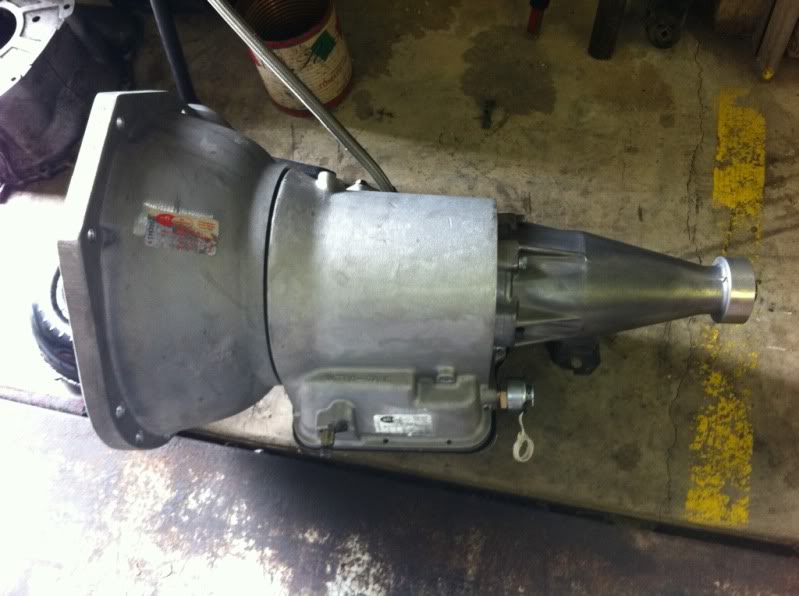
Here is a shot of the tranny after it was freshened up. The OEM housing had cracked around the pump bolts and the tailshaft housing bolts. This is a JW Ultra Case, JW Tailshaft Housing, and JW Bell. It is internally lined and is SFI certified without requiring an external shield. I’m also using a JW Wheel SFI approved flexplate. It has a Transking manual valve body with a Pro Tree Transbrake. The converter is a custom unit made by Bradco Engineering that stalls around 4800.

Mounting this B&M Pro Stick shifter was a breeze. I just removed the factory shifter and dust boot, blocked off the factory hole, and mounted the shifter to the tranny tunnel. A B&M cable connects the shifter to the tranny. A custom 4” aluminum driveshaft with nitride hardened 1350 slip yoke was made by a local shop.

I fashioned the bezel for the shifter out of 1/8” thick aluminum plate.

The beefed up bottom end consisted of Manley Forged H-beam rods, Manley Forged Flattop pistons, ARP 2000 Main Studs, and ARP 2000 Rod Bolts

The key to sealing the heads under high boost, or so I hoped, would be ARP 2000 Head Studs and Cometic MLS gaskets
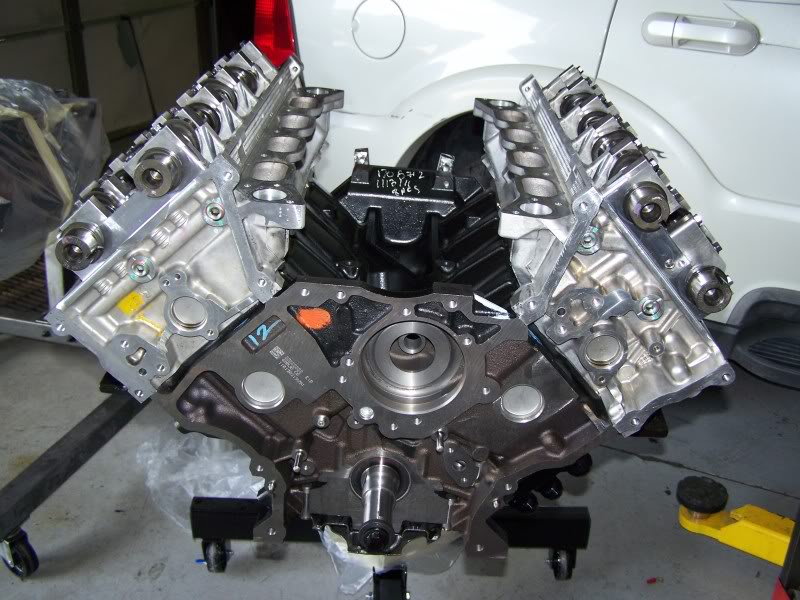
In this pic, the heads and cams have been installed. Unfortunately, I was rushed to get this build done, and cam cores were on national backorder. The only cam that I could find at the time was a Lunati stage 3 NA cam with 0.550” lift and 237 duration at 0.050” lift. While not ideal, they should be better than the stock cams. While I can’t prove it, I think the use of these cams may have contributed to excess cylinder pressures and my head gasket issues that I later encountered.
High lift cams, higher than factory rpms, and high boost require good valve springs. I opted for Manley titanium retainers and high lift springs as offered by MMR. Factory valves, seats, guides, seals, and rocker arms were retained for this build. Jesel offers a very nice rocker arm, but they are pricey and supposedly not necessary under 10,000 rpm.
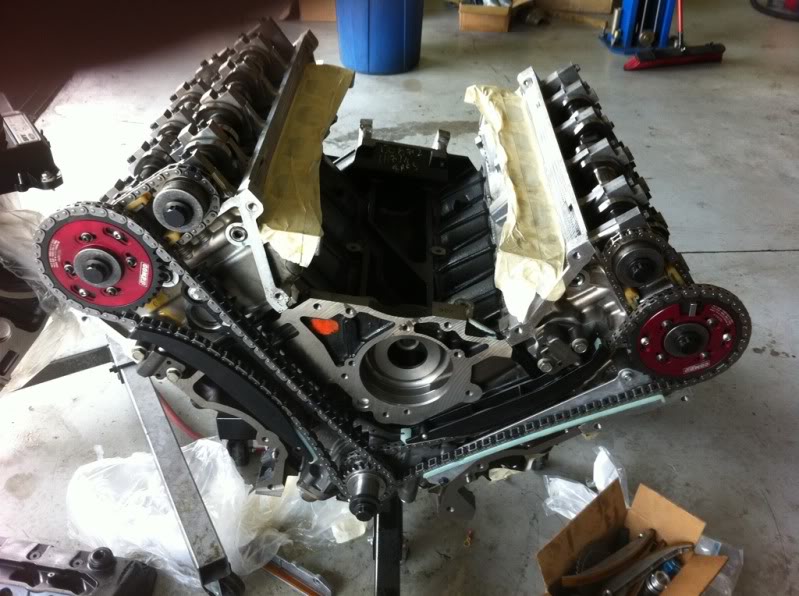
The timing components were replaced with the larger Navigator style components. Comp Cams Adjustable Cam gears, a factory 1-piece Navigator crank sprocket, Navigator primary chains, and Navigator chain guides and tensioner arms were used. The factory primary tensioners were retained. When switching to the larger cam gears, one must use the taller Ford GT or any older 4V modular cam covers in order to clear the larger sprockets. I would later discover that the cam position sensor would not read correctly off the Comp gear due to errant readings picked up off the steel set screws and a slight movement of the cam position sensor boss on the timing cover. Alternatives include, using the stock Ford GT timing components and grinding the keyways to degree the cams, using a Ford GT timing cover to move the cam sensor to the correrct position, or replacing the steel set screws with non-magnetic stainless screws. It also may be necessary to alter the sensor bar on the cam to make it larger or to use a combination of the above techniques.
Barely visible in the above pic is a Melling Billet High Volume Oil Pump with billet gears. It has long been known that the stock oil pump gears are prone to shattering in high horsepower high rpm applications.

This is a custom aluminum oil pan made by C-Line Engineering in Sellersburg, IN. It holds about 1.5 more quarts than stock and weighs less.

In this shot, the motor is nearly ready for install. Unlike other Ford mod motor applications, the GT500 and Ford GT use a water pump that has the inlet built into the pump, where all others use a water inlet on the side of the block in the same location as the oil filter mount. As an oil cooler really isn’t necessary in a drag racing setup, I chose to ditch the factory oil cooler and filter mount. Moroso makes a nice plate that bolts up to that location on the block that has a –16AN fitting for the water inlet, and two –12AN fittings for oil filter inlet and outlet lines. It is also necessary to remove the freeze plug that is located directly behind the water pump and to plug the hole behind that is used in other applications for the heater core line that runs through the valley. I had initially planned on using a Meziere electric water pump mounted in the factory location, but it was large enough to cause blower belt clearance issues. I ended up mounting a block-off plate in the factory location and utilizing a remote mounted water pump. The factory radiator and electric fan were more than sufficient for my purposes, so they were reused. The coolant line routing was simplified and unnecessary lines were deleted.

A shot of the oil filter lines running out of the adapter plate

I chose to mount the remote mounted oil filter inside the driver-side fenderwell for easy access. This piece is also made by Moroso, and includes ports that can be run to gauges or anything else than needs oiling like turbos or centrifugal blowers.

K-member spacers or a taller hood are required for clearance for the mighty 4.0L Whipple. Some places sell a several hundred dollar kit, but I opted to fabricate my own. These spacers were cut from ¾” aluminum bar. I then acquired slightly longer grade-8 bolts from the local Fastenal. These were used in conjunction with a BMR k-member with 1/2' lowered urethrane motor mounts.

Others have said that no hood modifications are necessary for Whipple 4.0L clearance, but I had to cut out a small portion of the center brace. I then painted the hole underside of the hood and most people don’t notice that this was done unless I point it out to them.
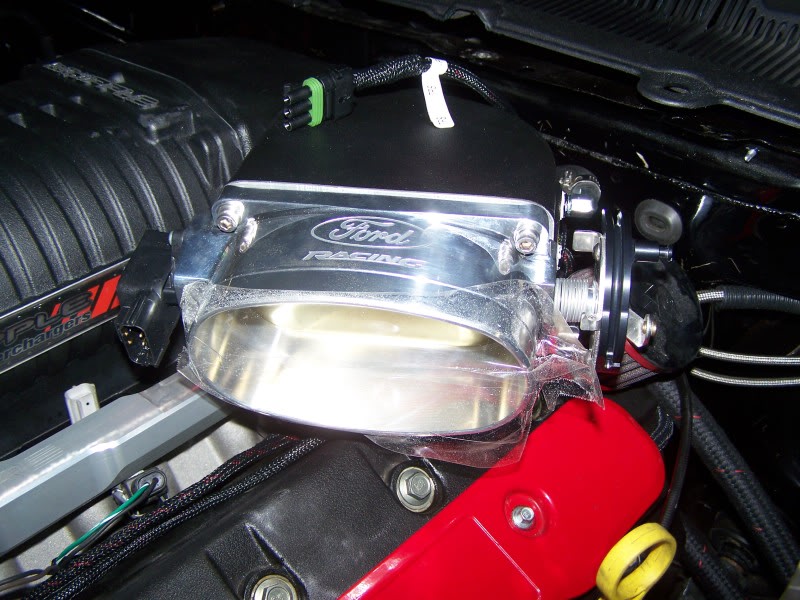
The Big Stuff 3 standalone ECU is not compatible with the factory drive-by-wire style throttle bodies or accelerator pedals. As far as I know, Ford Racing is the only company currently that offers a mechanical linkage throttle body with the correct bolt pattern to be a direct fit. Per Ford Racing, this unit measures 67mm x 147mm and flows 1805 cfm @ 28” water. I have compared it to the Whipple 160mm Monoblade and it measures identically.
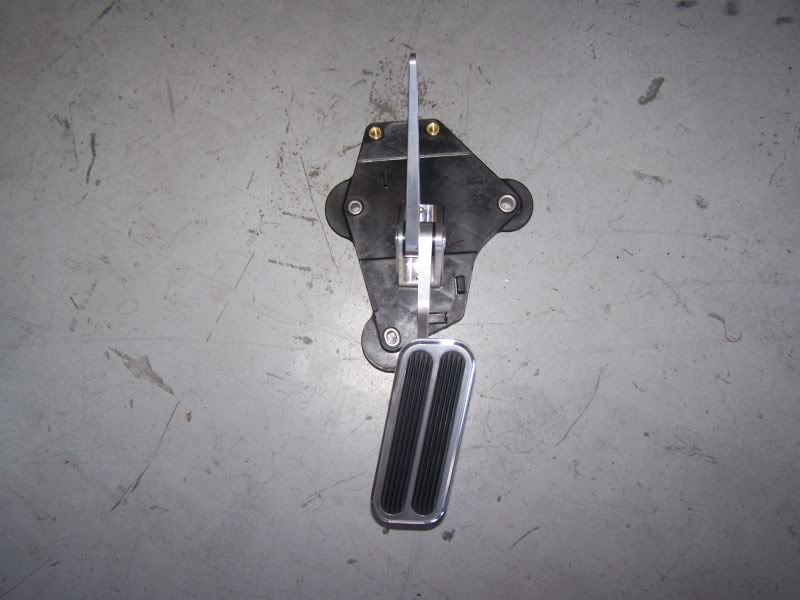
A Lokar universal accelerator pedal was mounted to the factory bracket and mounted to the firewall. A Lokar throttle cable was utilized in combination with a custom throttle bracket mounted to the throttle body.

The heart of the Big Stuff 3 system. It includes a complete wiring harness and wideband O2 sensor. Mine was equipped to interface directly with a Racepak instrument cluster, that displays RPM, coolant temp, AFRs, IATs, voltage, boost, and many other items. This is a newer version of Big Stuff 3 that uses the factory Ford Modular COPs instead of requiring LS1 COPs. It comes with a new 24-tooth crank trigger wheel. As far as I know, there is no way to make the factory instrument cluster interface with anything other than the factory PCM.

This is a custom fuel cell that we fabricated out of 0.080” thick aluminum sheet. A
-8AN return line fitting and –8AN vent line fitting can be seen on the top of the cell. On the bottom, are two –10AN fittings for feed lines to the fuel pumps. It holds about 10.7 gallons of fuel. Getting rid of the factory saddle-type fuel tank and installing a trunk mounted fuel cell allowed me to both save weight and to improve the weigh distribution of the car. I can also run the car with less fuel without having to worry about pickup starvation issues.

The fuel cell and ice tank are mounted via studs that I welded to the trunk floor. Here you can also see the –8AN return line and vent line.
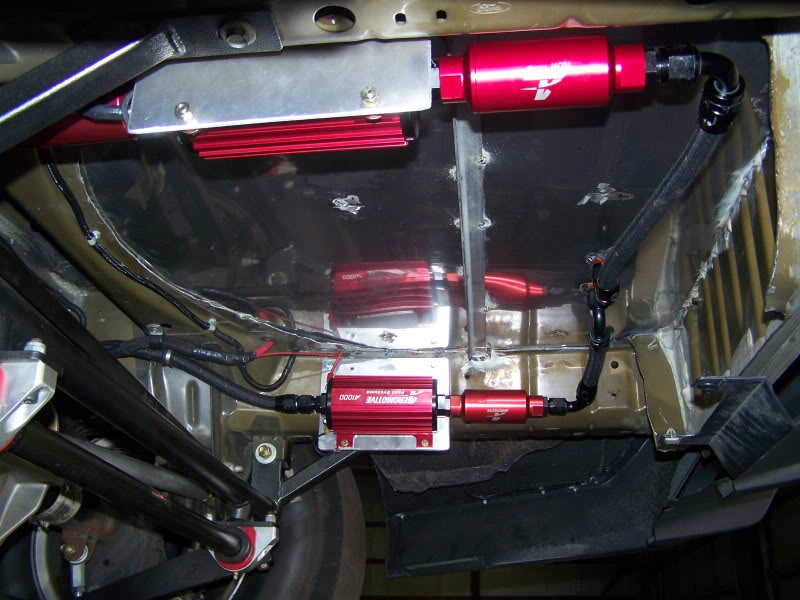
Two Aeromotive A1000 electric fuel pumps feed the fuel system and should provide growing room, as they are supposed to be good for 1000 fuel injected forced induction horsepower each. Each pump is fed by a –10AN line coming from the fuel cell and a 100 micron pre-filter. 10 micron post-filters are located after each pump and flow into –10AN lines. Here you can also see that I cut out the spare tire well and replaced it with a piece of flat stainless sheet.

The two –10AN feed lines merge via a Y-block and one –10AN line then runs to the front of the car to where it again splits via another Y-block with a separate –10AN line running to the rear of each billet Fore Precision Works fuel rail. The reason for the two Y-blocks was to prevent one cylinder bank from being completely starved of fuel if one pump should fail. Bosch low impedance 160 lb injectors are driven by the BS3 computer. A –8AN line exits each fuel rail and runs to the fuel pressure regulator before returning to the fuel cell via a –8AN return line. Aeroquip Startlite was used for all fuel lines.
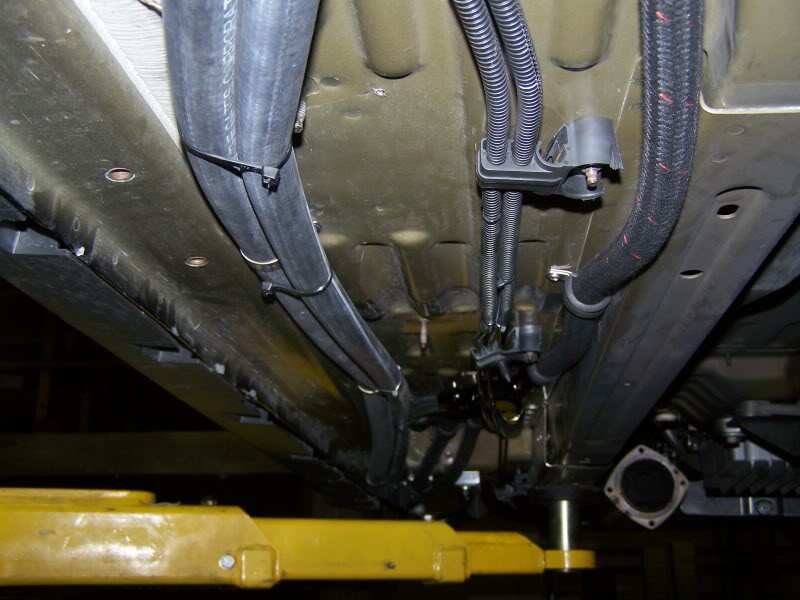
Here you can see the –10AN fuel feed line and the two ¾” rubber ice tank lines running to the front of the car.

The ice tank/intercooler reservoir was also fabricated out of 0.080” thick aluminum sheet. The top fitting is for a return line and the bottom fitting is for a feed line. The lid was obtained from a marine store and is otherwise known as a deckplate lid. It is lined with insulation to prevent condensation.

A bilge pump intended for marine applications is used to pump the icy water to the intercooler located within the lower intake manifold.

The fuel cell and ice tank/intercooler reservoir mounted in the trunk are easily accessible and greatly improve the weight distribution of the car. The air to liquid heat exchanger is no longer used. After the completion of the Whipple 4.0 build, the total weight of the car was 3290 without driver with 11 gallons of fuel in the fuel cell and 8 gallons of water in the ice tank yielding a much improved front to rear weight distribution of 53/47.

Notice the custom inlet made from PVC pipe.

Notice the lack of that horrible looking battery junction box and factory PCM. You can also see that all accessories have been removed and that only the blower is driven by the crankshaft. The electrical system is powered by two 16 volt batteries located in the trunk that help to improve the weight distribution and weigh in at 42 pounds each.

Big Stuff 3 is a speed density system and utilizes a MAP sensor. No MAF sensor is required.

Large 29.5 x 10.5/15 Mickey Thompson stiff sidewalled slicks help the car to find traction. These tires won’t fit without either narrowing the rear axles or removing some material inside the rearwheels. Solid mount adjustable control arms are used in conjunction with Tokico D-spec adjustable shocks and Cobra Jet springs. The Bogart wheels help to save about 100 pounds total compared to the factory 19” wheels. The front and rear sway bars are gone, and a BMR Extreme Anti-Roll Bar is used in the rear. Currently, the factory 8.8” rear uses a girdle style cover, welded axle tubes, Strange 33 spline axles, spool, and 3.55 gears.

28 x 4.5 x 17” M&H bias ply front runner tires are used.

While the car is still gonna get coilovers at some point, the current stance looks pretty good.
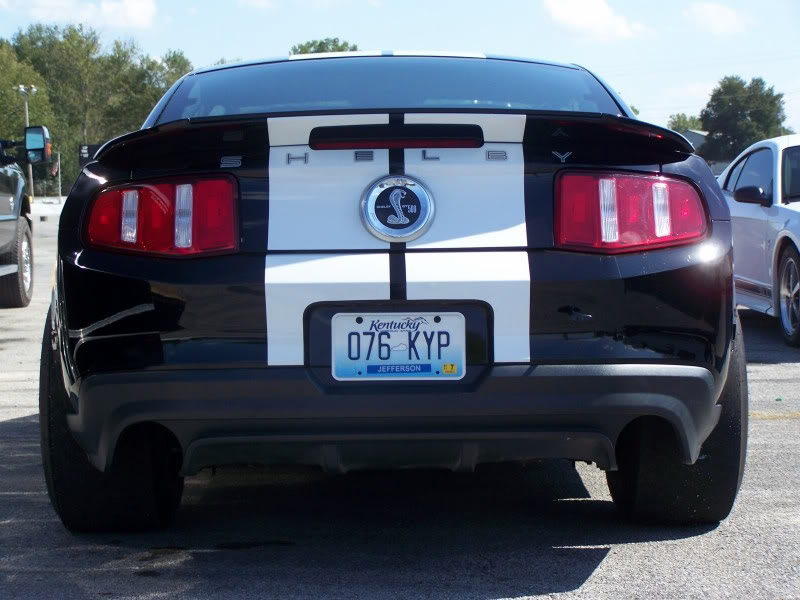
Subtly visible is the NHRA required master disconnect switch for trunk mounted batteries

There is nothing quite like a good, smoky burnout

Wheels up!!!!

Moving out!!!

Not bad for the 1st full 1/4 mile run on a new setup. Too bad that trap speed seems to be wrong
I had every intention of drag racing my car when I bought it. I think I had already pretty much picked out the Whipple 2.9 before I bought the car. My goal was to have a low 10 sec street/strip car. I distinctly remember picking the Whipple 2.9 because it would fit under the stock hood without k-member spacers, which I thought was just too much to do to a new car. Wow, how things change!!!
The Whipple 2.9 went on the car 3 weeks after driving the car home from the dealer. Charles Gordon of G.R.E.A.D. Tuning tuned the car, and it made 642 rwhp on a Mustang Dyno. I wanted more. After adding longtube headers, full 3" exhaust, a meth/water injection system, and a smaller blower pulley, the car was making over 750 rwhp and was running mid 6s in the 1/8 mile at the drag strip with the 6-speed tranny. Suddenly I found myself unwelcome at the drag strip until my car had a roll bar.
This is where the direction of the car started to turn drastically. I initially had a 6-point bar installed in the car that winter, and I was completely dissatisfied with it. Under my direct supervision, it was redone and morphed into a 10-point cage. While the interior was gutted, I started looking for ways to reduce the weight of car, as it was just too heavy. Gone were the stereo system, AC/heat, ABS, power brakes, power steering, factory seats, airbags, factory seatbelts, crash braces, mufflers, and many other small items. This paid off, as the new weight of the car after the cage was added with a 1/4 tank of fuel was 3320 pounds.
The car made it to the track once with this setup. What had worked the previous Fall, no longer worked. I made 2 bad passes and then the 3rd gear synchro in the transmission went out, before I could fully test this setup.
Not wanting to continue struggling with the 6-speed tranny, and having future plans of building a blistering fast twin-turbo car, I opted at this point for an auto swap. Luckily, there just happened to be a suitable tranny in another car in the shop--a Powerglide.
Back to the track we went, and were rewarded with a best of 6.35 @ 112 mph in the 1/8, but the car still wasn't getting off the line that well with dismal 60' times of 1.50. It was either bog or blow the tires off, but no happy medium. I had previously installed a nitrous system, but had yet to try it at the track--this might be the solution.
At this point, I noticed that Ford Racing had a built short block option with Manley H-beam rods for only $2850 shipped. Realizing that my factory bottom-end was living on borrowed time, I saw this as a great option for a temporary solution until I had the money to start the ultimate twin-turbo build. I was not keen on the low compression of 8:1 with that short block, and I managed to find another well-known vendor who would build a similiar short block with a compression ratio of 10:1.
The Whipple 2.9 was slated to go back on the car, until I learned about the upcoming GT500/Terminator Shootout. Even with the increased CR, this blower just didn't stand a chance of being competitive in that event. This is where the Whipple 4.0 came into the picture.
With the Shootout barely 3 months away, I knew that there was a lot of work to be done and little time to do it. I planned to have the car completed by late August so that we would have about a month to dial it in before Bowling Green. Unfortunately, everyone else seemed to have different plans. Cams were on a national backorder, machine shops took longer to do the work than they were supposed to, parts didn't come in on time or at all---nothing seemed to go my way.
Fast forward to Sept. 8. Everything was done and we were in the process of dyno tuning the car. The preliminary numbers looked promising, as we were seeing 920 rwhp at only 6100 rpm with pig rich AFRs and only 15 degrees of timing, and then...it happened. Both head gaskets blew, both heads were torched, and the crank keyway was sheared. It seemed that making it to NMRA would now be unlikely if not impossible.
It was now Wednesday Sept. 28. The fiance was threatening to leave me because of the amount of time that I was spending working on the car and I had another large machine shop bill to pay. We were still fighting EFI standalone gremlins and the car still hadn't been to the track. The car was blowing the tires off on the dyno and we destroyed a slick in the process of trying to tune it. The 13th hour had come and had passed.
We arrived in Bowling Green at 1pm on Thursday only to discover that there would be no Test and Tune that day as there had been in previous years. The car still wasn't completely tuned and needed some track time to get the tune nailed down. It would have to wait. We replaced the damaged slick and registered the car.
Friday, we made our 1st pass on the new setup. I had previously modified the rear bumper cover to allow for more tire clearance in the wheelwell for the larger 29.5 x 10.5" slicks. The bumper blew off around half track and tripped the battery disconnect lever in the process causing the car to shut down at around the 900 ft mark. We still clicked off a 9.34 @ 135 mph. Not too shabby considering the circumstances. On the 2nd pass, a vacuum line blew off yielding similar results. Test and Tune was now over and we made our first qualifying pass. We had just adjusted the shifter linkage and the car wouldn't shift into high gear. We achieved our best 60 ft of 1.39 and coasted to a spot of 2nd to last on the qualifying list.
It was now Saturday morning, and the 2nd round of qualifying was underway. The bumper and vacuum lines were secured and the shifter linkage had been readjusted and was functioning properly. Datalogs had been reviewed and the tune had been adjusted. We were still only running 17 degrees of total timing advance and the wideband gauges were still reading slightly rich. The launch looked good and the car went straight. A puff of gray erupted as the car went through the traps. The sign flashed 8.98 @ 175. While the mph seemed a tad fast, I was very pleased to see the 8 sec run on our first full 1/4 mile pass.
The radiator had been damaged when the head gaskets had blown 2 weeks prior and we had scrambled to repair it. It looked as if the radiator in tank had blown causing the spectacle at the end of the track. I continued to hope that the head gaskets were ok, but this hope ended as I refilled the coolant system and noted water to start pouring out of the exhaust. Apparently not even the Cometic MLS gaskets like 30 psi of boost and 10:1 compression. While our pass would have qualified us as 4th in the ladder, our weekend was over.
I'd like to say thanks to Charles Gordon and all the guys at G.R.E.A.D. Tuning in Corydon, IN for dyno time, tuning expertise, use of shop space and tools, and various other technical assistance. A big thanks to Mattingly Machine shop for getting the engine up and running again in such a short amount of time. I'd also like to thank Troy Cobb for his fabrication expertise and John Meaney for helping us to sort out the bugs in the BS3 standalone system. Also, thanks to DMotorsports for lending a hand to get the work done.

Whipple 2.9 configuration retaining all factory accessories

Just a very small portion of the factory wiring that was removed from the car. Eventually, all factory wiring was removed except what goes inside the doors, as it would require taking the doors off to remove it.

The factory fuseblocks and relays were replaced with several fuse blocks and relays such as these.

Before removal of rear package shelf/speaker deck

After removal of rear package shelf/speaker deck

From another angle showing after the removal of the rear package shelf/speaker deck

NHRA requires a rear firewall if a fuel cell is to be mounted in the trunk. It must constructed of aluminum no thinner than 0.032” or steel no thinner than 0.024”. I opted for aluminum. Here you can see it covered with trunk liner fabric.

Here is a shot of the rear firewall from another angle

In this pic, you can see that the HVAC unit has been removed, and the holes have been blocked off with aluminum sheet metal. The cage has been installed. I considered removing the sound deadener that you see in this photo on the transmission tunnel, but it’s weight is so miniscule, it would have saved less than a pound total. I did remove some of the heavier sound deadener that was under the driver seat, and the “tar mat” sound deadener from within the doors.

The 10-point chrome moly cage has been installed and painted. This cage is NRHA legal to 8.50.

Another pic of the cage and interior after reassembly

A pic of the dash bar. I felt a little uneasy when cutting the dash

I opted to replace the driver seat with a Corbeau FX1 Pro seat with microsuede fabric. The Corbeau seat and bracket only weight about 24 pounds vs. the factory driver seat weight of ~60 pounds. The passenger seat weighed about 50 pounds and was also removed.

Here is a pic of the trunk after installation of the cage and rear firewall. Obviously, this is an older photo that was taken before installation of the fuel cell. The sealed battery box seen here is actually not required since I installed the firewall.

This Strange front brake setup saves about 40 pounds compared to the factory setup

I wanted my car to go fast, but I wanted to take most of the driver variable out of the equation. An automatic transmission would allow me to do this. Additionally, automatics tend to be easier to launch and are more forgiving to drivetrain parts. I opted to go with a 2-speed Powerglide, as we had available that was sitting in another car. Many people would argue that a 3-speed auto transmission would be a better choice, and this argument does have some merit. With a first gear ratio of 1.76 and a 2nd gear ratio of 1.00, a steeper rear gear is needed to help get the car out of the hole and to help diminish rpm drop after the shift. A steeper rear gear makes a rev-friendly motor a necessity, which led me to abandon my quest with the factory shortblock. Here you see the an OEM cased Powerglide

Here is a shot of the tranny after it was freshened up. The OEM housing had cracked around the pump bolts and the tailshaft housing bolts. This is a JW Ultra Case, JW Tailshaft Housing, and JW Bell. It is internally lined and is SFI certified without requiring an external shield. I’m also using a JW Wheel SFI approved flexplate. It has a Transking manual valve body with a Pro Tree Transbrake. The converter is a custom unit made by Bradco Engineering that stalls around 4800.

Mounting this B&M Pro Stick shifter was a breeze. I just removed the factory shifter and dust boot, blocked off the factory hole, and mounted the shifter to the tranny tunnel. A B&M cable connects the shifter to the tranny. A custom 4” aluminum driveshaft with nitride hardened 1350 slip yoke was made by a local shop.

I fashioned the bezel for the shifter out of 1/8” thick aluminum plate.

The beefed up bottom end consisted of Manley Forged H-beam rods, Manley Forged Flattop pistons, ARP 2000 Main Studs, and ARP 2000 Rod Bolts

The key to sealing the heads under high boost, or so I hoped, would be ARP 2000 Head Studs and Cometic MLS gaskets

In this pic, the heads and cams have been installed. Unfortunately, I was rushed to get this build done, and cam cores were on national backorder. The only cam that I could find at the time was a Lunati stage 3 NA cam with 0.550” lift and 237 duration at 0.050” lift. While not ideal, they should be better than the stock cams. While I can’t prove it, I think the use of these cams may have contributed to excess cylinder pressures and my head gasket issues that I later encountered.
High lift cams, higher than factory rpms, and high boost require good valve springs. I opted for Manley titanium retainers and high lift springs as offered by MMR. Factory valves, seats, guides, seals, and rocker arms were retained for this build. Jesel offers a very nice rocker arm, but they are pricey and supposedly not necessary under 10,000 rpm.

The timing components were replaced with the larger Navigator style components. Comp Cams Adjustable Cam gears, a factory 1-piece Navigator crank sprocket, Navigator primary chains, and Navigator chain guides and tensioner arms were used. The factory primary tensioners were retained. When switching to the larger cam gears, one must use the taller Ford GT or any older 4V modular cam covers in order to clear the larger sprockets. I would later discover that the cam position sensor would not read correctly off the Comp gear due to errant readings picked up off the steel set screws and a slight movement of the cam position sensor boss on the timing cover. Alternatives include, using the stock Ford GT timing components and grinding the keyways to degree the cams, using a Ford GT timing cover to move the cam sensor to the correrct position, or replacing the steel set screws with non-magnetic stainless screws. It also may be necessary to alter the sensor bar on the cam to make it larger or to use a combination of the above techniques.
Barely visible in the above pic is a Melling Billet High Volume Oil Pump with billet gears. It has long been known that the stock oil pump gears are prone to shattering in high horsepower high rpm applications.

This is a custom aluminum oil pan made by C-Line Engineering in Sellersburg, IN. It holds about 1.5 more quarts than stock and weighs less.

In this shot, the motor is nearly ready for install. Unlike other Ford mod motor applications, the GT500 and Ford GT use a water pump that has the inlet built into the pump, where all others use a water inlet on the side of the block in the same location as the oil filter mount. As an oil cooler really isn’t necessary in a drag racing setup, I chose to ditch the factory oil cooler and filter mount. Moroso makes a nice plate that bolts up to that location on the block that has a –16AN fitting for the water inlet, and two –12AN fittings for oil filter inlet and outlet lines. It is also necessary to remove the freeze plug that is located directly behind the water pump and to plug the hole behind that is used in other applications for the heater core line that runs through the valley. I had initially planned on using a Meziere electric water pump mounted in the factory location, but it was large enough to cause blower belt clearance issues. I ended up mounting a block-off plate in the factory location and utilizing a remote mounted water pump. The factory radiator and electric fan were more than sufficient for my purposes, so they were reused. The coolant line routing was simplified and unnecessary lines were deleted.

A shot of the oil filter lines running out of the adapter plate

I chose to mount the remote mounted oil filter inside the driver-side fenderwell for easy access. This piece is also made by Moroso, and includes ports that can be run to gauges or anything else than needs oiling like turbos or centrifugal blowers.

K-member spacers or a taller hood are required for clearance for the mighty 4.0L Whipple. Some places sell a several hundred dollar kit, but I opted to fabricate my own. These spacers were cut from ¾” aluminum bar. I then acquired slightly longer grade-8 bolts from the local Fastenal. These were used in conjunction with a BMR k-member with 1/2' lowered urethrane motor mounts.

Others have said that no hood modifications are necessary for Whipple 4.0L clearance, but I had to cut out a small portion of the center brace. I then painted the hole underside of the hood and most people don’t notice that this was done unless I point it out to them.

The Big Stuff 3 standalone ECU is not compatible with the factory drive-by-wire style throttle bodies or accelerator pedals. As far as I know, Ford Racing is the only company currently that offers a mechanical linkage throttle body with the correct bolt pattern to be a direct fit. Per Ford Racing, this unit measures 67mm x 147mm and flows 1805 cfm @ 28” water. I have compared it to the Whipple 160mm Monoblade and it measures identically.

A Lokar universal accelerator pedal was mounted to the factory bracket and mounted to the firewall. A Lokar throttle cable was utilized in combination with a custom throttle bracket mounted to the throttle body.

The heart of the Big Stuff 3 system. It includes a complete wiring harness and wideband O2 sensor. Mine was equipped to interface directly with a Racepak instrument cluster, that displays RPM, coolant temp, AFRs, IATs, voltage, boost, and many other items. This is a newer version of Big Stuff 3 that uses the factory Ford Modular COPs instead of requiring LS1 COPs. It comes with a new 24-tooth crank trigger wheel. As far as I know, there is no way to make the factory instrument cluster interface with anything other than the factory PCM.

This is a custom fuel cell that we fabricated out of 0.080” thick aluminum sheet. A
-8AN return line fitting and –8AN vent line fitting can be seen on the top of the cell. On the bottom, are two –10AN fittings for feed lines to the fuel pumps. It holds about 10.7 gallons of fuel. Getting rid of the factory saddle-type fuel tank and installing a trunk mounted fuel cell allowed me to both save weight and to improve the weigh distribution of the car. I can also run the car with less fuel without having to worry about pickup starvation issues.

The fuel cell and ice tank are mounted via studs that I welded to the trunk floor. Here you can also see the –8AN return line and vent line.

Two Aeromotive A1000 electric fuel pumps feed the fuel system and should provide growing room, as they are supposed to be good for 1000 fuel injected forced induction horsepower each. Each pump is fed by a –10AN line coming from the fuel cell and a 100 micron pre-filter. 10 micron post-filters are located after each pump and flow into –10AN lines. Here you can also see that I cut out the spare tire well and replaced it with a piece of flat stainless sheet.

The two –10AN feed lines merge via a Y-block and one –10AN line then runs to the front of the car to where it again splits via another Y-block with a separate –10AN line running to the rear of each billet Fore Precision Works fuel rail. The reason for the two Y-blocks was to prevent one cylinder bank from being completely starved of fuel if one pump should fail. Bosch low impedance 160 lb injectors are driven by the BS3 computer. A –8AN line exits each fuel rail and runs to the fuel pressure regulator before returning to the fuel cell via a –8AN return line. Aeroquip Startlite was used for all fuel lines.

Here you can see the –10AN fuel feed line and the two ¾” rubber ice tank lines running to the front of the car.

The ice tank/intercooler reservoir was also fabricated out of 0.080” thick aluminum sheet. The top fitting is for a return line and the bottom fitting is for a feed line. The lid was obtained from a marine store and is otherwise known as a deckplate lid. It is lined with insulation to prevent condensation.

A bilge pump intended for marine applications is used to pump the icy water to the intercooler located within the lower intake manifold.

The fuel cell and ice tank/intercooler reservoir mounted in the trunk are easily accessible and greatly improve the weight distribution of the car. The air to liquid heat exchanger is no longer used. After the completion of the Whipple 4.0 build, the total weight of the car was 3290 without driver with 11 gallons of fuel in the fuel cell and 8 gallons of water in the ice tank yielding a much improved front to rear weight distribution of 53/47.

Notice the custom inlet made from PVC pipe.

Notice the lack of that horrible looking battery junction box and factory PCM. You can also see that all accessories have been removed and that only the blower is driven by the crankshaft. The electrical system is powered by two 16 volt batteries located in the trunk that help to improve the weight distribution and weigh in at 42 pounds each.

Big Stuff 3 is a speed density system and utilizes a MAP sensor. No MAF sensor is required.

Large 29.5 x 10.5/15 Mickey Thompson stiff sidewalled slicks help the car to find traction. These tires won’t fit without either narrowing the rear axles or removing some material inside the rearwheels. Solid mount adjustable control arms are used in conjunction with Tokico D-spec adjustable shocks and Cobra Jet springs. The Bogart wheels help to save about 100 pounds total compared to the factory 19” wheels. The front and rear sway bars are gone, and a BMR Extreme Anti-Roll Bar is used in the rear. Currently, the factory 8.8” rear uses a girdle style cover, welded axle tubes, Strange 33 spline axles, spool, and 3.55 gears.

28 x 4.5 x 17” M&H bias ply front runner tires are used.

While the car is still gonna get coilovers at some point, the current stance looks pretty good.

Subtly visible is the NHRA required master disconnect switch for trunk mounted batteries

There is nothing quite like a good, smoky burnout

Wheels up!!!!

Moving out!!!

Not bad for the 1st full 1/4 mile run on a new setup. Too bad that trap speed seems to be wrong
whatbumper- Posts : 3024
Join date : 2009-11-11
Age : 44
 Re: Hemi Twin Turbo Outlaw 10.5 Shelby build
That is quite a build, and an extremely well written article. I'm guessing you love to do both. 
Thanks for sharing.

Thanks for sharing.

Curt- Posts : 2791
Join date : 2009-02-08
Age : 62
Location : Henrietta, Texas but mostly on the road
 Re: Hemi Twin Turbo Outlaw 10.5 Shelby build
So that WAS YOU! I saw you lose the bumper before qualifying. I didn't make any T&T passes because I already had my car dialed in for Open Comp.
The mph was a bit glictchy all weekend so I'm 99% sure you received one of the incorrect numbers.
I can't believe you gutted a GT500

Regardless, Nice car and nice article. A twin boosted BBF will be a BEAST in that car!
The mph was a bit glictchy all weekend so I'm 99% sure you received one of the incorrect numbers.
I can't believe you gutted a GT500
Regardless, Nice car and nice article. A twin boosted BBF will be a BEAST in that car!

D. Sea- Posts : 2768
Join date : 2008-12-02
Age : 55
Location : Kentucky
 Re: Hemi Twin Turbo Outlaw 10.5 Shelby build
bitchen! nothen like cut'n up a new car. 

cool40- BBF CONTRIBUTOR

- Posts : 7313
Join date : 2009-08-31
Age : 53
Location : on the 1/8 mile dyno
 Re: Hemi Twin Turbo Outlaw 10.5 Shelby build
Alright, the Bogarts are sold. I'm in the process of picking out new wheels.
Here are the choices for the front:
1) Weld Aluma Star 2.0 polished 15x3.5"

2) Weld Aluma Star 2.0 black 15x3.5"

3) Billet Specialties Comp 5 polished 15x3.5"
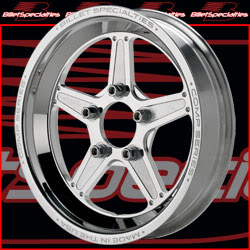
4) Billet Specialties Comp 5 black 15x3.5"

5) Billet Specialties Comp 5 2-piece polished 15x3.5"

6) Billet Specialties Street Lite polished 15x3.5"

Here are the choices for rear:
1) Weld Aluma Star 2.0 Black Beadlock 15x10"

2) Weld Aluma Star 2.0 Gold Beadlock 15x10"

3) Billet Specialties Comp 5 Black Beadlock 15x10"

4) Billet Specialties Street Lite Black Beadlock 15x10"

I think I'm leaning towards #2 for the front and #3 for the rear. Rear tires will be a Mickey Thompson 33x10.5W-15" ET Drag Slick. Front tires will be either a Mickey Thompson ET front 28x4.5-15" or 29x4.5-15"
Here are the choices for the front:
1) Weld Aluma Star 2.0 polished 15x3.5"

2) Weld Aluma Star 2.0 black 15x3.5"

3) Billet Specialties Comp 5 polished 15x3.5"

4) Billet Specialties Comp 5 black 15x3.5"

5) Billet Specialties Comp 5 2-piece polished 15x3.5"

6) Billet Specialties Street Lite polished 15x3.5"

Here are the choices for rear:
1) Weld Aluma Star 2.0 Black Beadlock 15x10"

2) Weld Aluma Star 2.0 Gold Beadlock 15x10"

3) Billet Specialties Comp 5 Black Beadlock 15x10"

4) Billet Specialties Street Lite Black Beadlock 15x10"

I think I'm leaning towards #2 for the front and #3 for the rear. Rear tires will be a Mickey Thompson 33x10.5W-15" ET Drag Slick. Front tires will be either a Mickey Thompson ET front 28x4.5-15" or 29x4.5-15"
 Re: Hemi Twin Turbo Outlaw 10.5 Shelby build
you will like the hemi, run it as a 604 for a while

BOSS 429- Posts : 2372
Join date : 2009-08-10
Location : Ill
 Re: Hemi Twin Turbo Outlaw 10.5 Shelby build
Your article pretty much shows exactly why I went with the BBF also. Not only are they much easier to work on vs the Mod motor, but, as your article shows, once you start really leaning on the little mod motor, it becomes pretty unreliable. While my current set up is no faster then what a mod motor could do with a lot of boost, it is certainly more reliable, as I make pass after pass without failure, all motor, in the 9.40s at 3420lbs.
I think in the end you are making the right choice, as the big block ford should give you the power you are looking for and do so with reliability. Of course as long as its built right, which would apply to any motor.
I think in the end you are making the right choice, as the big block ford should give you the power you are looking for and do so with reliability. Of course as long as its built right, which would apply to any motor.
 Re: Hemi Twin Turbo Outlaw 10.5 Shelby build
When I was reading your details you mentioned the mph was too fast, and I thought to myself that you were probably in the left lane at Beech Bend. Finally when I got down to your time slip, I saw that it was indeed the left lane. Bottom line is that it is about +3 mph fast at those speeds. That's something that the regular bracket racers know about and take into account. More seat time at all the area dragstrips will certainly be beneficial for you.
Nice build-up and very nice car!
Charlie Evans
P.S. Come to the Ford Winter Tech Seminar at Don Bowle's place on Jan. 14th. It's in Madisonville, KY. Read about it in the "Events Section"
Nice build-up and very nice car!
Charlie Evans
P.S. Come to the Ford Winter Tech Seminar at Don Bowle's place on Jan. 14th. It's in Madisonville, KY. Read about it in the "Events Section"
c.evans- BBF VENDOR SPONSOR

- Posts : 2260
Join date : 2008-12-03
 Re: Hemi Twin Turbo Outlaw 10.5 Shelby build
I just checked my schedule and I'm off on January 14. What topics will be discussed?
 Re: Hemi Twin Turbo Outlaw 10.5 Shelby build
Jon Kaase - engines
Darin Morgan - cylinder heads and manifolds
Tentatively - Carroll Carter (C&C Motorsports), an FRPP engineer from Ford, a cam designer from Comp Cams,....racing oil,,,,and probably E-85 and propane fuels, a round table question and answer session. Also I'm working on a chassis and suspension speaker. Lunch will be catered.
Charlie Evans
c.evans- BBF VENDOR SPONSOR

- Posts : 2260
Join date : 2008-12-03
 Re: Hemi Twin Turbo Outlaw 10.5 Shelby build
why in the world would you take a 2010 cobra and do that to it ? r u crazy 

badcoupe- Posts : 112
Join date : 2011-05-27
 Re: Hemi Twin Turbo Outlaw 10.5 Shelby build
^^ If I had a dollar for everytime someone asked that question....
 Re: Hemi Twin Turbo Outlaw 10.5 Shelby build
Sometimes we buy a car and say ,well we'll just do this, and then we do that,lol
next thing you know its race only or close to it, I got a freind does this all the time
next thing you know its race only or close to it, I got a freind does this all the time

BOSS 429- Posts : 2372
Join date : 2009-08-10
Location : Ill
 Re: Hemi Twin Turbo Outlaw 10.5 Shelby build
Nice looking car! If I ever win the lottery I had planned on buying a Rousch stage III and doing the same thing, I was planning on backhalving it too. But Alas that is just a dream at this point.

bigblok2000ranger- Posts : 1745
Join date : 2010-04-07
Age : 45
Location : Beloit,WI
 Re: Hemi Twin Turbo Outlaw 10.5 Shelby build
c.evans wrote:Jon Kaase - engines
Darin Morgan - cylinder heads and manifolds
Tentatively - Carroll Carter (C&C Motorsports), an FRPP engineer from Ford, a cam designer from Comp Cams,....racing oil,,,,and probably E-85 and propane fuels, a round table question and answer session. Also I'm working on a chassis and suspension speaker. Lunch will be catered.
Charlie Evans
A suggestion.....have the chassis guy be familiar with SS stuff as that's where the future will be for awhile. Maybe Dave Zimmermon (hint hint). All too often guys who can set up a back half big tire car have zero clue on what to do with 2/3rds less tire.

yellowhorse7- Posts : 1382
Join date : 2009-11-16
Age : 98
Location : Polk County
 Re: Hemi Twin Turbo Outlaw 10.5 Shelby build
bigblok2000ranger wrote:Nice looking car! If I ever win the lottery I had planned on buying a Rousch stage III and doing the same thing, I was planning on backhalving it too. But Alas that is just a dream at this point.
This wasn't planned when I bought the car. It just kind of snowballed into what it has become.
 Re: Hemi Twin Turbo Outlaw 10.5 Shelby build
I understand that that is what happened with my last engine build, and after 2 seasons of racing I want more now! This hobby is so addicting!

bigblok2000ranger- Posts : 1745
Join date : 2010-04-07
Age : 45
Location : Beloit,WI
Page 1 of 7 • 1, 2, 3, 4, 5, 6, 7 
 Similar topics
» Giuseppe Gentile Twin Turbo Hemi
» Giuseppe Gentile Twin Turbo BBF Hemi
» a few pics at scsn in vegas
» Twin Turbo Big Block Ford Hemi Dyno - 2400Hp
» 460 Twin Turbo - Finalizing the build & Selecting Turbos - Help Please
» Giuseppe Gentile Twin Turbo BBF Hemi
» a few pics at scsn in vegas
» Twin Turbo Big Block Ford Hemi Dyno - 2400Hp
» 460 Twin Turbo - Finalizing the build & Selecting Turbos - Help Please
Page 1 of 7
Permissions in this forum:
You cannot reply to topics in this forum