Building the Chassis Fixture (Finished)
+17
Nevs
cool40
res0rli9
AZFairlane
the Coug
racnrick
QtrWarrior
Wayne Pearce
'65 T-BOLT
72mav
dfree383
DILLIGASDAVE
bruno
BigDave65
Frank Merkl
IDT-572
Doug Rahn
21 posters
Page 2 of 2
Page 2 of 2 •  1, 2
1, 2
 Re: Building the Chassis Fixture (Finished)
Nice Doug..... when you get it done bring it by my place and I will check it out for ya and let you know how it works..... 

the Coug- Posts : 3055
Join date : 2008-12-02
 Re: Building the Chassis Fixture (Finished)
Then let me use it and I can verify the Coug.the Coug wrote:Nice Doug..... when you get it done bring it by my place and I will check it out for ya and let you know how it works.....

'65 T-BOLT- Posts : 1464
Join date : 2009-08-28
Age : 53
Location : Hagerstown,Maryland
 Re: Building the Chassis Fixture (Finished)
'65 T-BOLT wrote:Then let me use it and I can verify the Coug.the Coug wrote:Nice Doug..... when you get it done bring it by my place and I will check it out for ya and let you know how it works.....
sounds fair we would not wish Doug to use something that is not tested would we????

the Coug- Posts : 3055
Join date : 2008-12-02
 Re: Building the Chassis Fixture (Finished)
I'm sorry, that's not Doug's shop. The floor is not clean and polished. 


AZFairlane- BBF CONTRIBUTOR

- Posts : 573
Join date : 2009-02-02
Age : 71
Location : Glendale, AZ
 Re: Building the Chassis Fixture (Finished)
AZFairlane wrote:I'm sorry, that's not Doug's shop. The floor is not clean and polished.

 Re: Building the Chassis Fixture (Finished)
So TRUE!...plus he needs the room for a pair of engine swaps!the Coug wrote:'65 T-BOLT wrote:Then let me use it and I can verify the Coug.the Coug wrote:Nice Doug..... when you get it done bring it by my place and I will check it out for ya and let you know how it works.....
sounds fair we would not wish Doug to use something that is not tested would we????

'65 T-BOLT- Posts : 1464
Join date : 2009-08-28
Age : 53
Location : Hagerstown,Maryland
 Re: Building the Chassis Fixture (Finished)
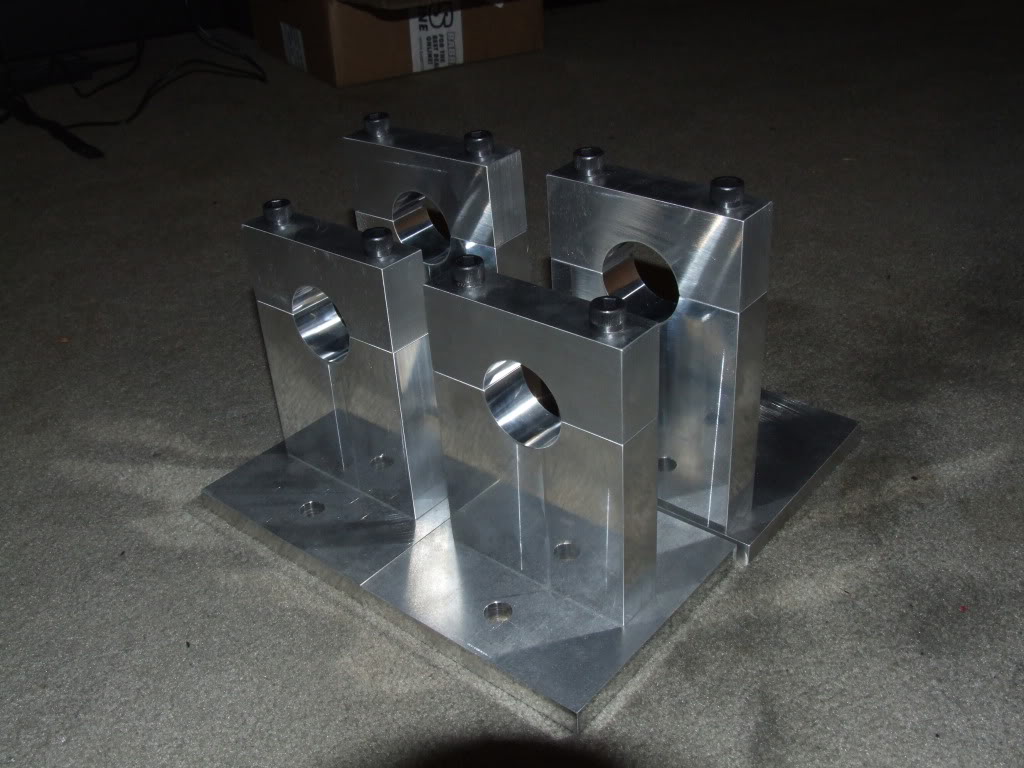
I got these pieces from David Willingham yesterday  . These are four of the major jig points to build the chassis. Shorter ones for the front of the frame rails, and the taller ones are for the cross-member at the main hoop. Thanks David, they look great. If any of y'all ever need a custom part machined, I would highly recommend contacting David first. The workmanship is top shelf and the prices are reasonable. This is like the forth thing I've had him make for me and I've never been disappointed.
  I have more on the drawing board I'll be getting with him about.

 Re: Building the Chassis Fixture (Finished)
Doug Rahn wrote:I got these pieces from David Willingham yesterday. These are four of the major jig points to build the chassis. Shorter ones for the front of the frame rails, and the taller ones are for the cross-member at the main hoop. Thanks David, they look great. If any of y'all ever need a custom part machined, I would highly recommend contacting David first. The workmanship is top shelf and the prices are reasonable. This is like the forth thing I've had him make for me and I've never been disappointed.
I have more on the drawing board I'll be getting with him about.
David Willingham is tha (MAN)

IDT-572- BBF CONTRIBUTOR

- Posts : 4628
Join date : 2008-12-02
Age : 63
Location : Shelbyville Tn.
 Re: Building the Chassis Fixture (Finished)
looks like outstanding workmanship 

'65 T-BOLT- Posts : 1464
Join date : 2009-08-28
Age : 53
Location : Hagerstown,Maryland
 Re: Building the Chassis Fixture (Finished)
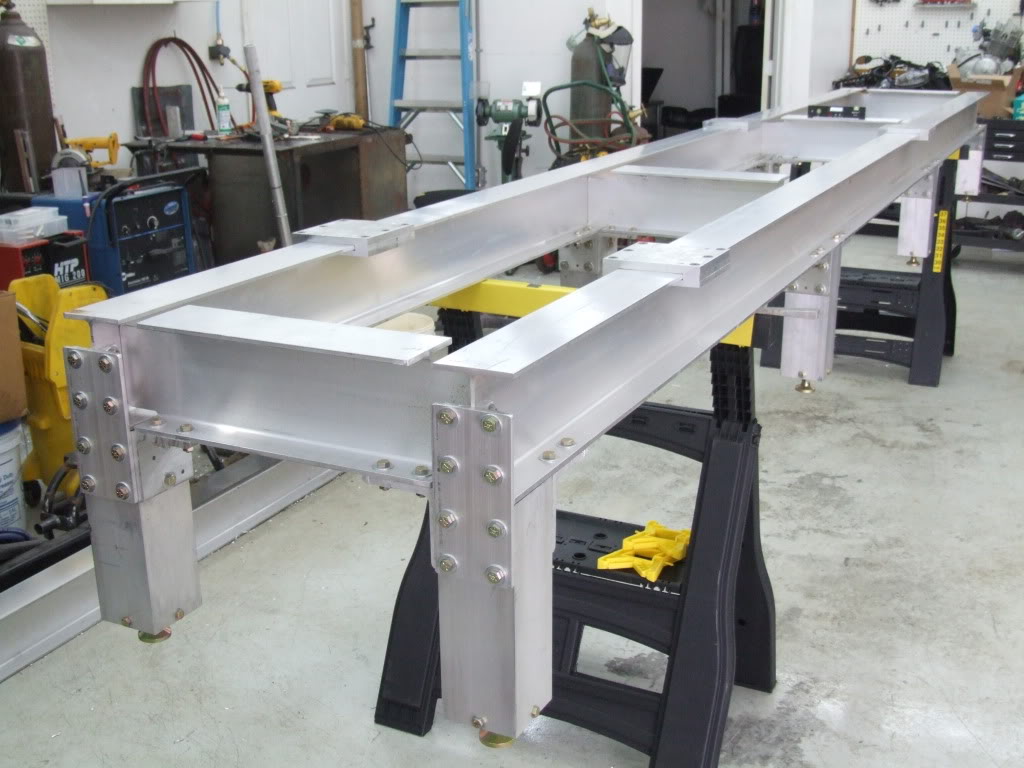
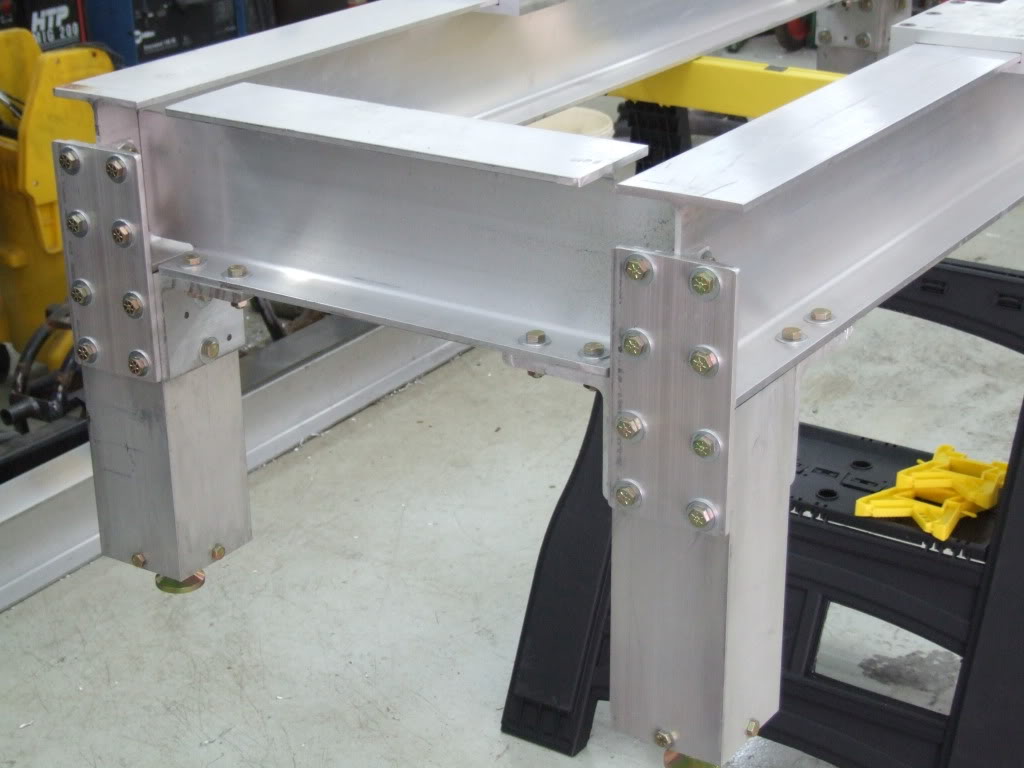
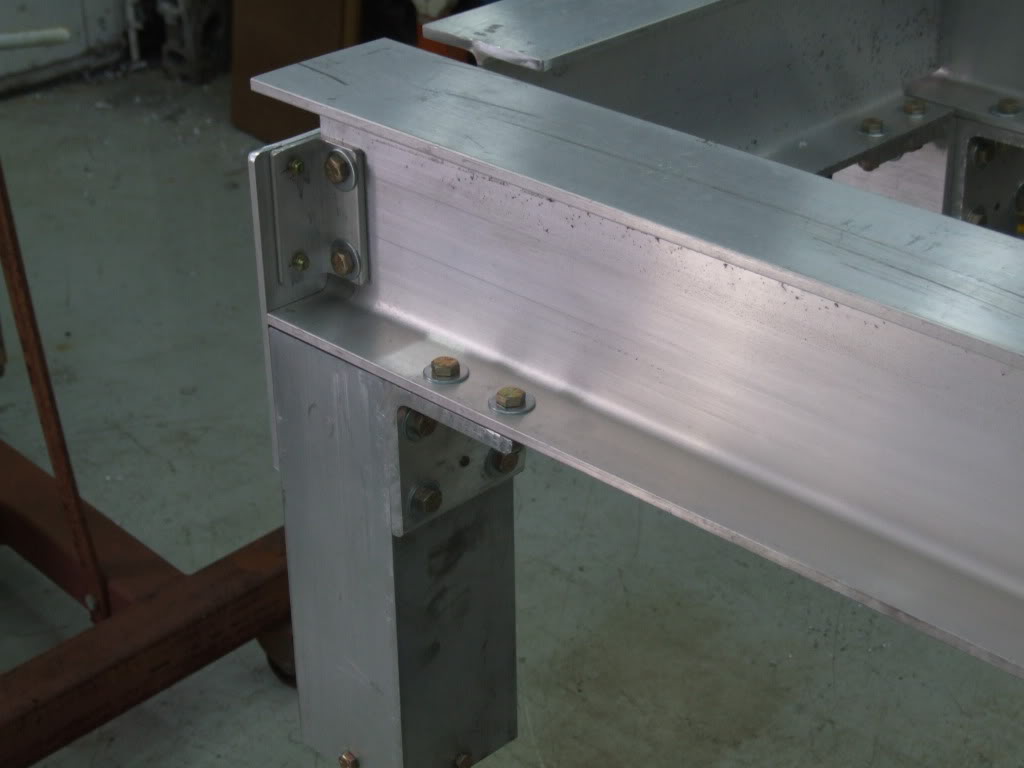
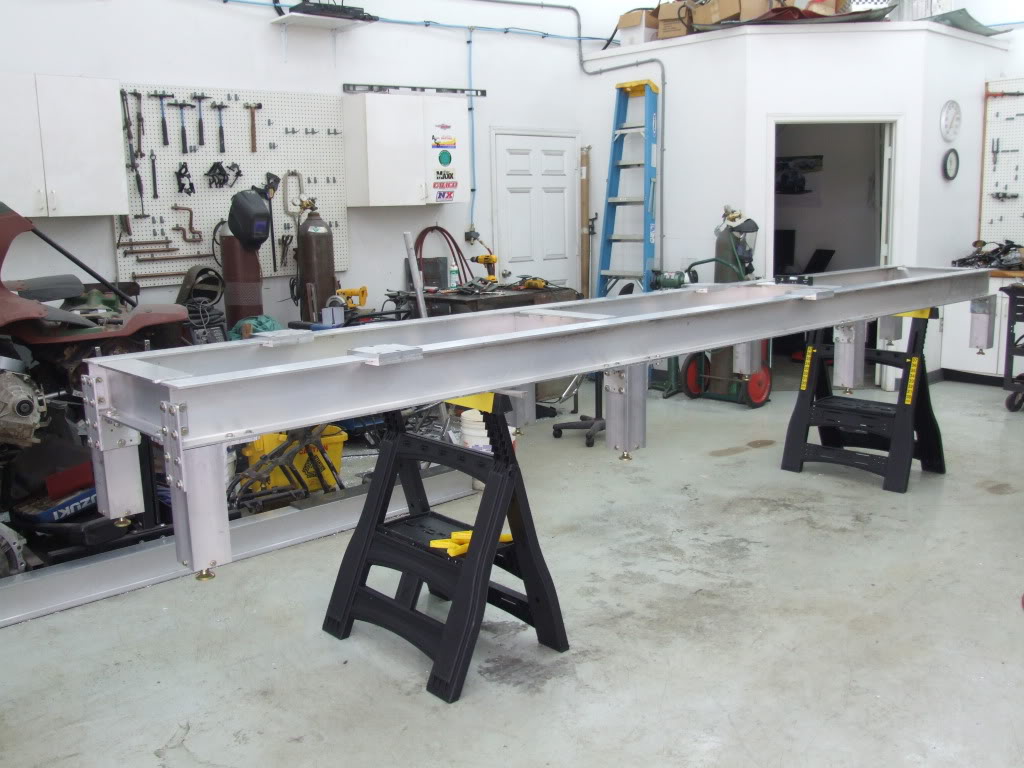
Getting close to getting this thing finished.  I still have to put the end plates on the other end and when I get the 6" angles David is correcting for me I can start on the new chassis. And kudos to David about the quality of his work. He is currently making some new blower cases for a Top Fuel team that had some problems at Gainesville last weekend
  . And one more big obstacle to get pass, get my bothers up here to help clean out the other side of my shop
  .
.
 .
.


 Re: Building the Chassis Fixture (Finished)
That is just AWESOME. 


res0rli9- BBF CONTRIBUTOR

- Posts : 3352
Join date : 2008-12-02
Age : 74
Location : sarasota FL.
 Re: Building the Chassis Fixture (Finished)
Can't wait to see that chassis he will be building. This table is freaking awesome Doug!

'65 T-BOLT- Posts : 1464
Join date : 2009-08-28
Age : 53
Location : Hagerstown,Maryland
 Re: Building the Chassis Fixture (Finished)
i hope you have better luck with your brothers cleaning up than i do with my kids!  nice job!

cool40- BBF CONTRIBUTOR

- Posts : 7313
Join date : 2009-08-31
Age : 53
Location : on the 1/8 mile dyno
 Re: Building the Chassis Fixture (Finished)
Outstanding job Doug! 

Nevs- BBF CONTRIBUTOR

- Posts : 2724
Join date : 2009-02-07
Age : 70
Location : NW Iowa(Odebolt)
 Re: Building the Chassis Fixture (Finished)
Looking good Doug! Your angles are on the way. You were right about them being off. I ending up having to machine the sides flat so I could hold them well enough to remove the 1/8" off material it took to square them up. I went ahead and cut both surfaces to 90* because they were bowed about .020". They are dang near perfect now. Have fun!
David Willingham- BBF CONTRIBUTOR

- Posts : 495
Join date : 2008-12-02
Age : 52
Location : Blountsville, AL
 Re: Building the Chassis Fixture (Finished)
David Willingham wrote:Looking good Doug! Your angles are on the way. You were right about them being off. I ending up having to machine the sides flat so I could hold them well enough to remove the 1/8" off material it took to square them up. I went ahead and cut both surfaces to 90* because they were bowed about .020". They are dang near perfect now. Have fun!
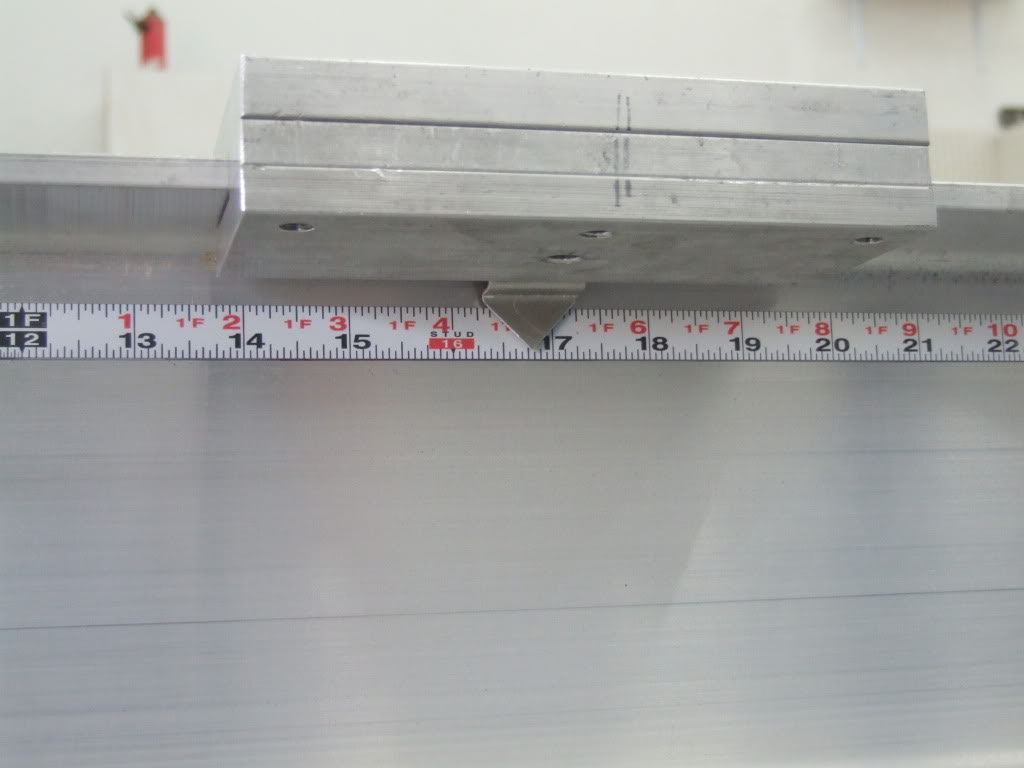
Thanks David, I'll keep and eye out for them. I added this little feature today, some Starrett self adhesive measuring tape for the slides. I'll add it on the other side when I get it finished and everything is squared up and permanent.

 Re: Building the Chassis Fixture (Finished)
Doug i posted this link on another site and the guys love the design , but someone had commented on the aluminum twisting due to temperature changes , but i told them you shop was temperature controlled ....should that be something you would have to worry about ?
_________________
coming soon x275 build .........
thanks to all my sponsors :
www.OakleyMotorsports.com
www.Induction-Solutions.com
www.bfevansraceparts.com
www.ultimateconverter.com
www.keithfulpmotorsports.com
 Re: Building the Chassis Fixture (Finished)
if his shop is like mine he can keep it 72* year round...............

richter69- Posts : 13649
Join date : 2008-12-02
Age : 53
Location : In the winners circle
 Re: Building the Chassis Fixture (Finished)
bruno wrote:Doug i posted this link on another site and the guys love the design , but someone had commented on the aluminum twisting due to temperature changes , but i told them you shop was temperature controlled ....should that be something you would have to worry about ?
Not a problem, my shop is insulated better than my house is. Besides, for it to twist like they are talking about, it would have to be a really extreme temperature swing.
 Re: Building the Chassis Fixture (Finished)
Any chassis jig will move around to some degree regardless of how rigid it's built or the material it's made of. And no mater how many fixture points there are attaching the chassis/frame to the jig, the chassis will still push/pull/move around to some degree during welding. It's usually not a big deal.

DILLIGASDAVE- Posts : 2262
Join date : 2009-08-08
Location : Texas. pronounced "texASS"
 Re: Building the Chassis Fixture (Finished)
Doug Rahn wrote:David Willingham wrote:Looking good Doug! Your angles are on the way. You were right about them being off. I ending up having to machine the sides flat so I could hold them well enough to remove the 1/8" off material it took to square them up. I went ahead and cut both surfaces to 90* because they were bowed about .020". They are dang near perfect now. Have fun!
Thanks David, I'll keep and eye out for them. I added this little feature today, some Starrett self adhesive measuring tape for the slides. I'll add it on the other side when I get it finished and everything is squared up and permanent.
Doug what I like about the tape measure is that you can get them that reads from left to right or right to left I have the part #s at work we use them on saw tables.
Jim
69F100- BBF CONTRIBUTOR

- Posts : 5386
Join date : 2009-01-04
Age : 57
Location : Irwinville Ga.
 Re: Building the Chassis Fixture (Finished)
Finished it yesterday, just need to clean out a dedicated spot for it on the other side of my shop.

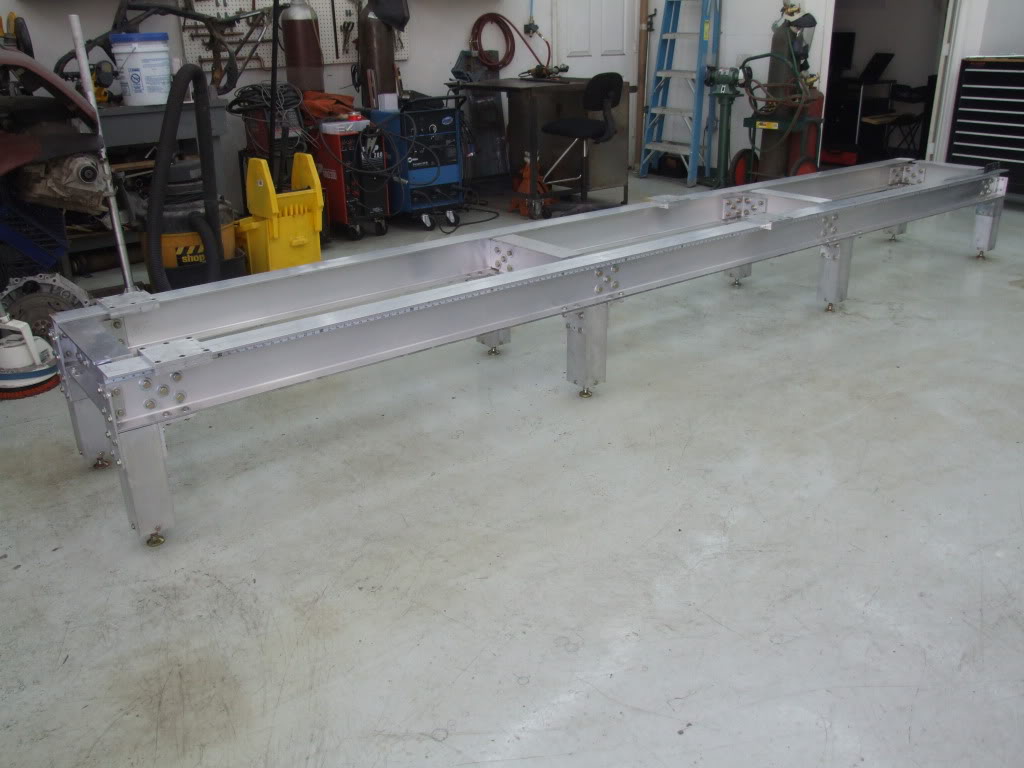


 Re: Building the Chassis Fixture (Finished)
thats nice! now when would you like to start on my new car? 

cool40- BBF CONTRIBUTOR

- Posts : 7313
Join date : 2009-08-31
Age : 53
Location : on the 1/8 mile dyno
 Re: Building the Chassis Fixture (Finished)
That is too nice to be in the shop.
Make a glass top for it, put in the kitchen for big dinners!
Nice work!
Keith
Make a glass top for it, put in the kitchen for big dinners!
Nice work!
Keith
Page 2 of 2 •  1, 2
1, 2
 Similar topics
» Racetruck is finally finished at the chassis shop.
» New project underway :)
» IT'S FINISHED!!!
» Finished the license
» boat #1 finished .....
» New project underway :)
» IT'S FINISHED!!!
» Finished the license
» boat #1 finished .....
Page 2 of 2
Permissions in this forum:
You cannot reply to topics in this forum