25.1E ------- 64 Fairlane
+45
nitrous.f
Goldylox_fairlane
Bill Heard
wickettoby1
litshoot
rbro460
Mark Miller
738drvr
774 Super Street
drksyde64
DILLIGASDAVE
jasonf
ssurles268
pmrphil
rmcomprandy
D. Sea
Doug Rahn
514Fox87
Tomasw
Lem Evans
TravisRice
maverick532
Wayne Pearce
slurm
BBFTorino
res0rli9
69F100
AZFairlane
Race Ready Fabrications
larry552
BigBlockFalcon
Scott Foxwell
gmsmkr
7.5L1985GT
Mustang-junky
514F-1
stanger68
whitefield
bruno
cool40
jeffgfg
FalconEh
68formalGT
Mike R
QKiss
49 posters
Page 1 of 13
Page 1 of 13 • 1, 2, 3 ... 11, 12, 13 
 25.1E ------- 64 Fairlane
Moving my build over here from the o-t-h-e-r sight due to complications with not being able to straiten out there new pass word issues. May take me a bit to get up to speed as the format is a little different. See if I can post a picture?

Cool it worked. Now my dalema is where to start --- Do I pick up here and go forward or go back and recap some of the initial build? The car is entering the final stages.The photo is from a while back and the tin is done rear wing is mounted and now working on the front fenders and grill.
What would you guys like to see? ---- Qkiss
Last edited by QKiss on July 5th 2016, 11:54 pm; edited 1 time in total (Reason for editing : spelling)
QKiss- Posts : 157
Join date : 2012-08-05
Location : Nor Cal -- Fortuna behind the Redwood curtian
GFPRACING and nedceifus like this post
 Re: 25.1E ------- 64 Fairlane
I've been following your build over there and I think you should post it all, very informative and the craftsmanship is awesome
Mike R- Posts : 1381
Join date : 2009-08-05
Age : 63
Location : St Paul Mn
 Re: 25.1E ------- 64 Fairlane
Welcome!! Glad you're here and nice car!!

68formalGT- Posts : 865
Join date : 2012-02-13
Location : Pueblo West, Colorado
GFPRACING likes this post
 Re: 25.1E ------- 64 Fairlane
Mike R wrote:I've been following your build over there and I think you should post it all, very informative and the craftsmanship is awesome
I agree with Mike, recap what you feel comfortable with and show the build, we would like to see it and how it came to be.
FalconEh- Posts : 1448
Join date : 2014-08-21
Location : on the blacktop or in the mountains ????
GFPRACING likes this post
 Re: 25.1E ------- 64 Fairlane
OK Men ---- here we go from the beginning.


I know none of your projects started out like this.
 After the wild life was chased out it was easier to work on


Tools used to cut and remove unwanted body parts and prep body.


I know none of your projects started out like this.

Tools used to cut and remove unwanted body parts and prep body.


QKiss- Posts : 157
Join date : 2012-08-05
Location : Nor Cal -- Fortuna behind the Redwood curtian
GFPRACING likes this post
 Re: 25.1E ------- 64 Fairlane
I have been amazed by your build on the other site!!! I hope you show the whole thing over here. I am looking forward to see it all again from the start!!!!
jeffgfg- Posts : 338
Join date : 2010-02-06
GFPRACING likes this post
 Re: 25.1E ------- 64 Fairlane
Hell yea! I like it! Keep up the great work! 

cool40- BBF CONTRIBUTOR

- Posts : 7313
Join date : 2009-08-31
Age : 53
Location : on the 1/8 mile dyno
 Re: 25.1E ------- 64 Fairlane
Thanks guys. ----- Will do. As we go along if you have any questions don't hesitate to ask. ------ Qkiss
QKiss- Posts : 157
Join date : 2012-08-05
Location : Nor Cal -- Fortuna behind the Redwood curtian
 Re: 25.1E ------- 64 Fairlane
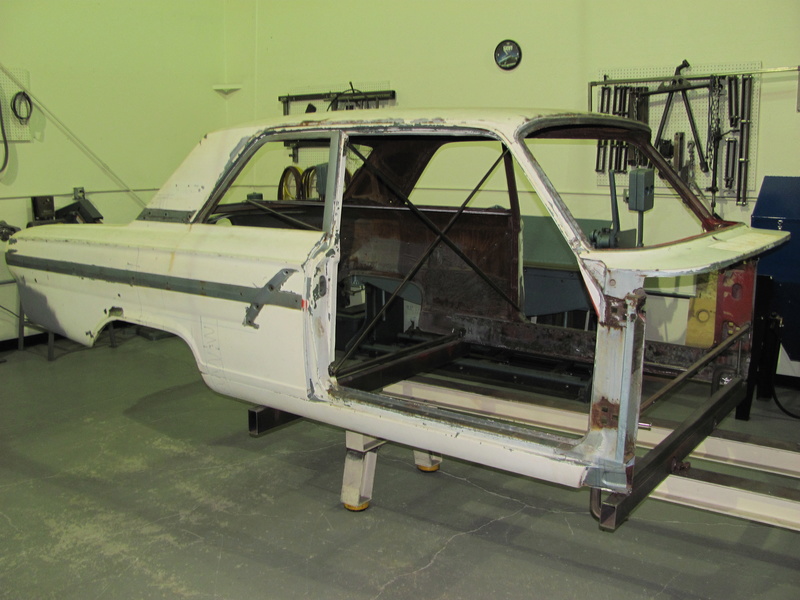
In an effort to save as much weight as possible anything that is not needed is removed.
Cab part of body set up on the chassis jig



Any double wall sheet metal is removed all round and yes it is a lot of work but remember the devil is in the details.

The idea here was to to cut the firewall area as flat and straight as possible keeping firewall tin installation in mind. As you will see as we go forward the plan will change.
Cab part of body set up on the chassis jig


Any double wall sheet metal is removed all round and yes it is a lot of work but remember the devil is in the details.

The idea here was to to cut the firewall area as flat and straight as possible keeping firewall tin installation in mind. As you will see as we go forward the plan will change.
Last edited by QKiss on February 20th 2018, 3:01 am; edited 2 times in total (Reason for editing : photo repost)
QKiss- Posts : 157
Join date : 2012-08-05
Location : Nor Cal -- Fortuna behind the Redwood curtian
 Re: 25.1E ------- 64 Fairlane
wow , cant wait to see the finished product !!
_________________
coming soon x275 build .........
thanks to all my sponsors :
www.OakleyMotorsports.com
www.Induction-Solutions.com
www.bfevansraceparts.com
www.ultimateconverter.com
www.keithfulpmotorsports.com
 Re: 25.1E ------- 64 Fairlane
bruno wrote:wow , cant wait to see the finished product !!
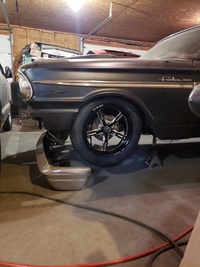
I must admit this build did get out of hand. This build started out to be a 10 second bracket car. ------------------ But with a little help from my ----- F-R-I-E-N-D-S ----- it turned into this.
QKiss- Posts : 157
Join date : 2012-08-05
Location : Nor Cal -- Fortuna behind the Redwood curtian
 Re: 25.1E ------- 64 Fairlane
looks very good ! i maybe some what partial to the 64s . thanks for the post and pics. 
whitefield- Posts : 2244
Join date : 2009-08-23
Age : 56
 Re: 25.1E ------- 64 Fairlane
Keep it coming buddy, it just keeps getting better
Mike R- Posts : 1381
Join date : 2009-08-05
Age : 63
Location : St Paul Mn
 Re: 25.1E ------- 64 Fairlane
Dig that! Nice work.
stanger68- Posts : 500
Join date : 2015-12-05
Location : Birmingham, Al
 Re: 25.1E ------- 64 Fairlane
Standing back and looking at the top it seemed higher in the front than in the rear.The decision was made to chop the top and take 3" out of the front and 2" out of the rear. Hoping it would not look chopped unless parked next to a stocker.

Front jig with long arms 3" down and able to slide top back for more aerodynamic laid back windshield.


2" cut from lower "C" post and locating tabs tack welded to top for indexing.

Inside copper chill plate.

Outside chill plate on top of inside plate with body panel sandwiched in between. The plates are used as heat sinks and eliminate warping when TIG welded.
Last edited by QKiss on February 22nd 2018, 8:36 am; edited 2 times in total (Reason for editing : photo repost)
QKiss- Posts : 157
Join date : 2012-08-05
Location : Nor Cal -- Fortuna behind the Redwood curtian
 Re: 25.1E ------- 64 Fairlane
Was following your build on the other site, but I too had issues and quit going over there. Looking forward to watching it i here. '64 Fairlane is one of my dream cars, cant wait to see yours finished.

514F-1- Posts : 242
Join date : 2013-08-06
Age : 36
Location : Plant City FL
 Re: 25.1E ------- 64 Fairlane
514F-1 wrote:Was following your build on the other site, but I too had issues and quit going over there. Looking forward to watching it i here. '64 Fairlane is one of my dream cars, cant wait to see yours finished.
Not surprised I am not the only one.
Thanks for the ataboy ---- Knowing you guys are interested in the build keeps me motivated to keep posting. ----- Qkiss
Last edited by QKiss on July 8th 2016, 10:36 pm; edited 1 time in total (Reason for editing : Addition to text)
QKiss- Posts : 157
Join date : 2012-08-05
Location : Nor Cal -- Fortuna behind the Redwood curtian
 Re: 25.1E ------- 64 Fairlane

With the "B" post shortend and the top moved back a gap was left in the window frame. There was also a rusted section of window frame needing replacing.
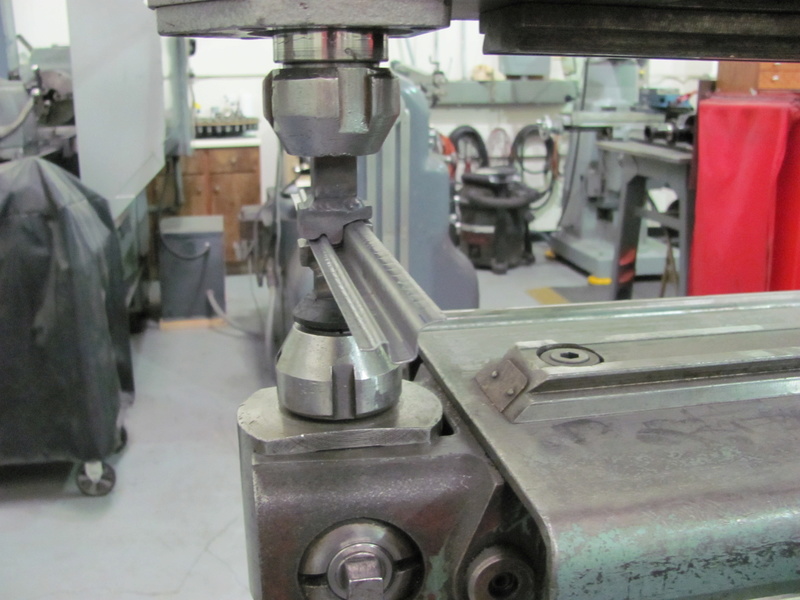
This is a 12" long section of window frame being made up to cover all the required repairs and additions.
The machine used for this is a Pullmax nibbler with custom made forming dies.
The finished window frame work is made up of 2 sections TIG welded and buffed out.

Sections were then cut and welded in place as needed.

TIG welded
And buffed out.
With the top finished the windshield angle increase is noticeable.
Last edited by QKiss on February 21st 2018, 12:34 am; edited 1 time in total (Reason for editing : repost photos)
QKiss- Posts : 157
Join date : 2012-08-05
Location : Nor Cal -- Fortuna behind the Redwood curtian
nedceifus likes this post
 Re: 25.1E ------- 64 Fairlane

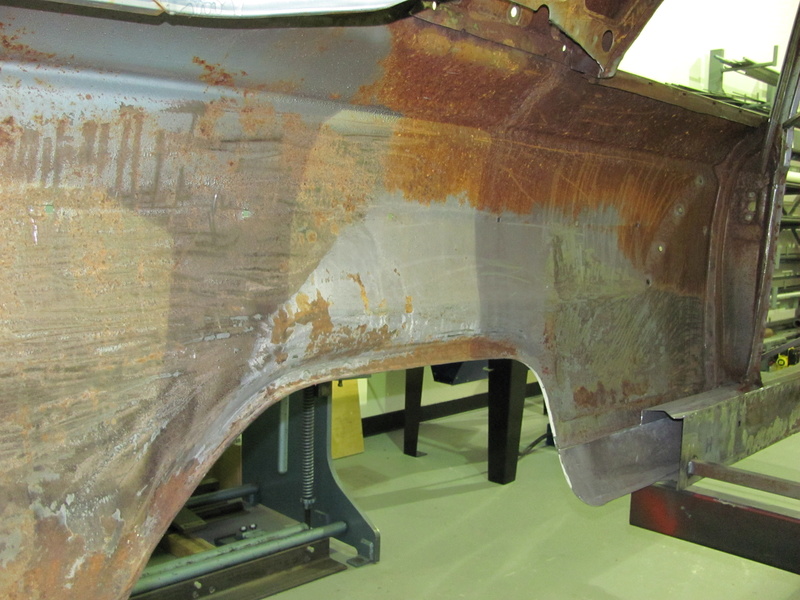
This is the method used to open up the quarter panel wheel opening to clear the 33.5/17.0-16 rear tires. After mock up the 5" detention was shortened to 4".


If you look to the lower center of the picture 2 inches to the left of the broken center line is a short broken line. This is the stock rear axle center line. In order to center the wheel tubs in the "C" post area and install them as high as possible under the stock body. The rear end was moved forward 2 inches.
The wheel opening front section was the only part needing modification. A center line cut was made up and then 90 degrees straight forward parallel to the ground far enough forward to clear all the wheel opening body features then 90 degrees straight down. The cut out panel was then moved forward 4"-- and a line was ascribed along the forward edge on the body and the 4" piece was cut out. The panel is then installed in its new location 4" forward of its stock location.

Then it is a simple task to make up a little sheet metal filler piece for the center 4" gap.
Last edited by QKiss on February 22nd 2018, 9:03 am; edited 2 times in total (Reason for editing : repost photos)
QKiss- Posts : 157
Join date : 2012-08-05
Location : Nor Cal -- Fortuna behind the Redwood curtian
 Re: 25.1E ------- 64 Fairlane
You make it all look so easy.  Thanks for sharing.
Jess
Jess

Mustang-junky- Posts : 438
Join date : 2011-12-04
Location : Central New York. The state, not the city.
 Re: 25.1E ------- 64 Fairlane
Mustang-junky wrote:You make it all look so easy.Thanks for sharing.
Jess
Thanks Jess -------A little about me. I opened a chassis shop back in 1978 and have been messing with this stuff ever since. I have picked up a few skills along the way with some tools and equipment. I would like to pass along some of the things I have picked up and hope some of these ideas are useful. I know some of the equipment shown here only a very few will ever own or be around but there are also things that can be done in your garage. ----------- Remember-------- Sometimes your mind is stretched out of shape by a new idea never to go back to its original form. You may come up with your own ideas on how to do the same thing. A fella on another forum I am on says there is more than one way to get to town and they will all get you there. -------- Qkiss
QKiss- Posts : 157
Join date : 2012-08-05
Location : Nor Cal -- Fortuna behind the Redwood curtian
GFPRACING likes this post
 Re: 25.1E ------- 64 Fairlane

This full floater rear end had been just installed in a Top Sportsman car with only 6 passes on it when the front of the car and guard rail got to friendly with each other and tweaking the chassis beyond repair. It was pulled and bounced around from shop to shop for about 3 years no luck finding a home. A buddy told me about it and before I knew it it ended up in my shop not knowing if it was even close to fitting. To my surprise if I were to build one from scratch it would have exactly the same dimensions. --------- It found a home
Cleaned up ---- 4.11 center ------ rear driveshaft loop ready to install.

Tire --- inner body 1/4 panel clearance mock up.
Custom front 4 link brackets laid out ---- Stack of 4 tack welded together and drilling adjustment bolt hole pattern.

Hole sawing tubing holes.
Looking for missing photos will post if located??

Bracket perimeter sawed out on band saw.

Front 4 link brackets welded together at proper spacing with spreader tubes and bolt hole doubler plates.
Last edited by QKiss on February 22nd 2018, 9:28 am; edited 1 time in total (Reason for editing : repost photos)
QKiss- Posts : 157
Join date : 2012-08-05
Location : Nor Cal -- Fortuna behind the Redwood curtian
GFPRACING likes this post
 Re: 25.1E ------- 64 Fairlane
Wow is this thing cool!! I too am a sicko for the details. Draws out the completion time but I think it's well worth it. Nice job, can't wait to see more!
GFPRACING likes this post
 Re: 25.1E ------- 64 Fairlane
7.5L1985GT wrote:Wow is this thing cool!! I too am a sicko for the details. Draws out the completion time but I think it's well worth it. Nice job, can't wait to see more!
I enjoy the build as much as the racing and you are right it does drag out the build time. I was a chassis builder for years always working on the clock. This is my personal car and am enjoying not being on the clock with this build. ------- Qkiss
QKiss- Posts : 157
Join date : 2012-08-05
Location : Nor Cal -- Fortuna behind the Redwood curtian
GFPRACING likes this post
 Re: 25.1E ------- 64 Fairlane

Fitting the cage perimeter tubes tight to the inner body.

"A" post cage tubes fit closely to body to maximize visibility.

Rear tail section layout.

More tube body orientation.

Cardboard wheel tub end cap template used as mock up to verify cage tube layout for wheel tub location.

Another wheel tub template shot
QKiss- Posts : 157
Join date : 2012-08-05
Location : Nor Cal -- Fortuna behind the Redwood curtian
GFPRACING likes this post
Page 1 of 13 • 1, 2, 3 ... 11, 12, 13 
 Similar topics
» 64 Fairlane Strut Front Suspension Conversion Its Done! JIT for the bash!
» Finally got to the track
» My 66 Fairlane 472
» 528 in 64 Fairlane
» My 66 Fairlane 472
» Finally got to the track
» My 66 Fairlane 472
» 528 in 64 Fairlane
» My 66 Fairlane 472
Page 1 of 13
Permissions in this forum:
You cannot reply to topics in this forum