Project EconoTow
+28
Bigred69
460pulling
jeffgfg
dave d
fatal addiction
maverick
cool40
Dave C.
Mike R
QtrWarrior
bigblok2000ranger
jbozzelle
69F100
jasonf
bruno
res0rli9
prosandguy
dfree383
bbf-falcon
72mav
schmitty
bosshoss
richter69
Lem Evans
lghting94
61coon
DILLIGASDAVE
Doug Rahn
32 posters
Page 4 of 9
Page 4 of 9 •  1, 2, 3, 4, 5, 6, 7, 8, 9
 Re: Project EconoTow
dfree383 wrote:Doug Rahn wrote:dfree383 wrote:You try Sanders? and just coat them?
Yep, primary's are to small.
On shorties with an exhaust system it wont make a giant differents in the rpm range you will be towing in.
IMHO, even in a towing application a 557 with 1-7/8" primary tubes would be like trying to exhale through a straw. Just don't make good sense to me.
 Re: Project EconoTow
dfree383 wrote:Doug Rahn wrote:dfree383 wrote:You try Sanders? and just coat them?
Yep, primary's are to small.
On shorties with an exhaust system it wont make a giant differents in the rpm range you will be towing in.
I tried to tell him...

QtrWarrior- Posts : 2703
Join date : 2008-12-02
Age : 65
Location : Bloomingdale, Ga
 Re: Project EconoTow
QtrWarrior wrote:dfree383 wrote:Doug Rahn wrote:dfree383 wrote:You try Sanders? and just coat them?
Yep, primary's are to small.
On shorties with an exhaust system it wont make a giant differents in the rpm range you will be towing in.
I tried to tell him...
Cammed right for towing it will be out of wind at 4000-4500...... Or even a little lower, no reason to be spinning one built for real towing. The 1 7/8 tubes are plenty big. One needs to get their mind off race cars and shift into tow mode.

dfree383- BBF CONTRIBUTOR

- Posts : 14851
Join date : 2009-07-09
Location : Home Wif Da Wife.....
 Re: Project EconoTow
dfree383 wrote:QtrWarrior wrote:dfree383 wrote:Doug Rahn wrote:dfree383 wrote:You try Sanders? and just coat them?
Yep, primary's are to small.
On shorties with an exhaust system it wont make a giant differents in the rpm range you will be towing in.
I tried to tell him...
Cammed right for towing it will be out of wind at 4000-4500...... Or even a little lower, no reason to be spinning one built for real towing. The 1 7/8 tubes are plenty big. One needs to get their mind off race cars and shift into tow mode.
You're assuming too much without knowing what my plans are, so we can agree to disagree. Sure they would be adequate, but not optimal and I never settle for adequate when I have other options available.
 Re: Project EconoTow
Update on the Econoline. For one reason or another, Mike and I haven't been able to get to the track. Mostly the weather has not been cooperating, so I've been spending most of my weekends out in the shop. I've been working on the rear suspension with some good progress. After changing the rear suspension design a half dozen times, I ended up with what I call a 4-Link Ladder Bar. This works the best without getting any weird angles in the drive-shaft since it will only be about 18" long. Waiting on the hardware for the rod ends, hence the smaller or no bolts in the photo.
With the pinion moved to the center-line I had to cut 3-1/2" from the axle tube from the drivers side. I'll be installing an 8" long slug inside the tube to beef up the splice and a crap load of welding passes since the axle tube is 1/2" thick. My older brother is turning down the slug a few thousandths so we get a good snug fit. I should get it back tomorrow.
I also got the air bag brackets located and tacked it. Since the Dana 80 center section is so hugh, the lower bracket on the drivers side overlapped the center section right where the tube enters. I had to get creative on that one with some welding to the casting and added brackets, (no photo of that one). Also with it that close the housing the air bag would rub and eventually fail. To solve that problem and have the air bags at their design ride height I'll have to add in some 1-1/2" spacers to get the clearance I need.


 Re: Project EconoTow
Damn fine work pappy!

dfree383- BBF CONTRIBUTOR

- Posts : 14851
Join date : 2009-07-09
Location : Home Wif Da Wife.....
 Re: Project EconoTow
Looking good Doug
Mike R- Posts : 1381
Join date : 2009-08-05
Age : 63
Location : St Paul Mn
 Re: Project EconoTow
Are the chassis brackets tall enough that you could add a bunch of holes allowing you to convert to a more conventional 4 bar setup (in the future) if the ladder link setup ends up being too rigid and/or not allow enough body-roll on the street?

DILLIGASDAVE- Posts : 2262
Join date : 2009-08-08
Location : Texas. pronounced "texASS"
 Re: Project EconoTow
DILLIGASDAVE wrote:Are the chassis brackets tall enough that you could add a bunch of holes allowing you to convert to a more conventional 4 bar setup (in the future) if the ladder link setup ends up being too rigid and/or not allow enough body-roll on the street?
Yes, I could do that later if I needed to, but I don't foresee any problems with binding like you would see with the conventional ladder bar setup. That's the main reason I put a rod end on the forward top bar which is normally welded. Also all of the rod ends have High Misalignment spacers that the Rock Crawler/Off Road guys use, lots of movement there. Once I get both sides done I will be jacking it through full suspension travel especially like you would see with full body roll.

 Re: Project EconoTow
Bump for an update !! 

QtrWarrior- Posts : 2703
Join date : 2008-12-02
Age : 65
Location : Bloomingdale, Ga
 Re: Project EconoTow
QtrWarrior wrote:Bump for an update !!
Here you go. Yesterday I started fabricating my Super Duty wishbone. I still have to make the slide piece, which I ordered the steel for yesterday. 1-1/2" diameter piece of Stressproof 1144 steel that is ground and polished, just have to drill and tap a 7/8-14 hole in one end and machine a couple of small round bottom grooves to help retain grease on the other end.

I picked up this badass Diff cover from Blue Torch Fab that is made from 1/4" plate with a 3/8" flange. I still have to make more pieces and some welding to do so the rod end is attached in double shear.
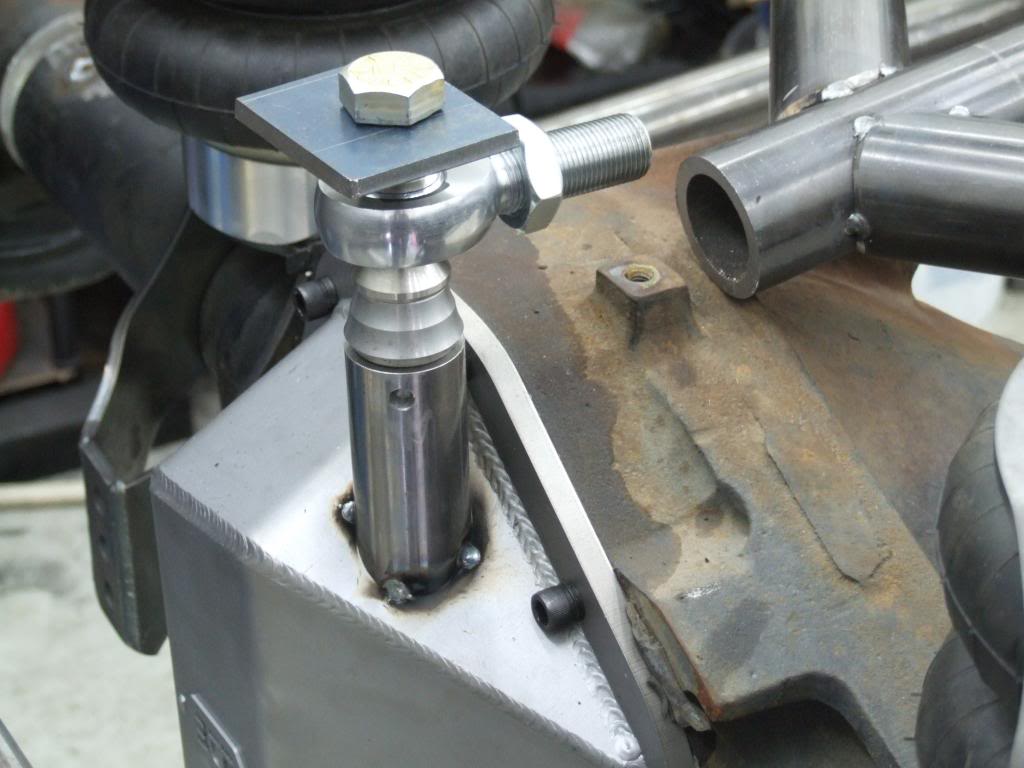
I also made a change after many hours on the computer and discussions with my brothers on the 4 link setup. In my previous posted photos the upper bar on the forward end was attached to the lower bar with a rod end. But this had the potential for the upper bar to push or rotated the lower bar. I did come up with an easy fix for this but would have required some frequent maintenance. So I moved the mount to the frame bracket at a point where the pivot was close to and aft. of the centerline on the lower bar. This will help to limit some of the weird angles on the "U" joints with such a short driveshaft.

 Re: Project EconoTow
I usually try to stay out of the shop on Sundays, but I wanted to get the wishbone housing bracket finished up. Plus the shocks I ordered are suppose to be coming on the Big Brown truck tomorrow, so that will give next weekend to work on those brackets.


Here's a shot showing the spacers we made for the air springs.


Here's a shot showing the spacers we made for the air springs.

 Re: Project EconoTow
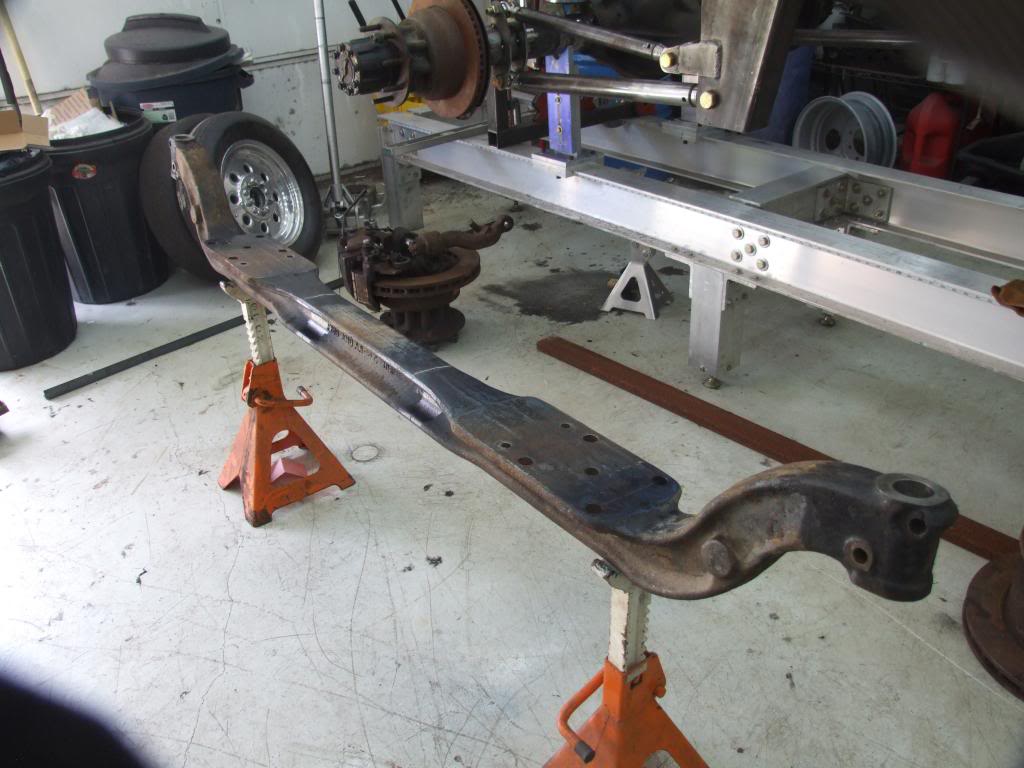
With the rear suspension mockup completed, it was time to start on the front. Originally I was going to use the Econoline axle but I really wanted something more heavy duty to go along with dually Dana 80 I have for the rear.
I found a great deal on Ebay I couldn’t pass up, the front axle that came out of a burned up 1999 Dolphin 34ft. motor home (Ford F53 chassis). Naturally its way too wide for my deal, so I’m going to cut it and weld. Something I’ve really been trying to avoid, but I think we have come up with a way to do it without compromising the structural integrity. The cut will be made very similar to a scarf joint used in timber framing which will triple the length of the weld area compared to a cut straight through. Then that area will be covered with machined plates to fit the profile of the “I” beam. I’ll explain more and post up some photos when I get that far.
Right now I have to build a fixture before any welding is done so I don’t lose the angles on the Kingpins, which by the way are huge. LOL, everything on this is hugh! Brake rotors are a massive 15-1/2” in diameter and 1-1/2” thick.
Using this axle does present one little problem, two different bolt circles for the wheels, 8x170 for the Dana 80 and 8x225 for the front. But I have been in contact with a gentleman (Lenny Stahl) at Motorsport Tech who specializes in custom wheel adapters, which are hub to wheel concentric. Since I using the big brakes on the front, he’s going to make adapter to go from 8x170 to the 8x225 so I can use the big 19.5 wheels and only have to carry one size spare tire.
One thing is for sure, with these big brakes all the way around it’ll stop on a dime. I’ll post up more as I make progress.


 Re: Project EconoTow
This is a bitch'n build Doug! 

cool40- BBF CONTRIBUTOR

- Posts : 7313
Join date : 2009-08-31
Age : 53
Location : on the 1/8 mile dyno
 Re: Project EconoTow
Nice!
jasonf- BBF CONTRIBUTOR

- Posts : 2994
Join date : 2009-07-14
Age : 55
Location : Lafayette, LA
 Re: Project EconoTow
How much travel does the rear suspension have with that 4 bar setup?
jbozzelle- Posts : 3705
Join date : 2009-08-10
Age : 50
Location : New Orleans
 Re: Project EconoTow
jbozzelle wrote:How much travel does the rear suspension have with that 4 bar setup?
5-1/2" travel with the shocks I picked. If I used longer shocks it could have as much as 10".
 Re: Project EconoTow
I finished up the fixture I've been building to shorten and weld the F53 axle. I start doing some layout and cuts, but it's just to damn hot, I'll start again early tomorrow morning.
To save some money I built the base from 4 layers of 3/4" hardwood plywood (11 ply's per layer), glued and screwed. Dressed the edges with 1x4 that gave me a little overhang on the top. I then poured a self leveling fiberglass powder reinforce epoxy resin on the top a 1/2 thick. After it cured I check the surface everywhere and it was dead nuts level checking with two different digital levels that I have. Then I spent many hours setting up the linear rails and bearings to make sure they where level and square. Then I spent many more hours setting up the axle and king pins to make sure it was dead on. Now when I cut the axle, all I have to do is slide it in to the fixed side to where I want it and weld. After the "I" beam is welded I'll be adding on some external pieces to reinforce the splice.

Started laying out a scribe line for the cut and cut one of the holes for a nice radius in the splice.

Screen shot of my CAD drawing showing the fixture and how it works and how I'm making the splice.

To save some money I built the base from 4 layers of 3/4" hardwood plywood (11 ply's per layer), glued and screwed. Dressed the edges with 1x4 that gave me a little overhang on the top. I then poured a self leveling fiberglass powder reinforce epoxy resin on the top a 1/2 thick. After it cured I check the surface everywhere and it was dead nuts level checking with two different digital levels that I have. Then I spent many hours setting up the linear rails and bearings to make sure they where level and square. Then I spent many more hours setting up the axle and king pins to make sure it was dead on. Now when I cut the axle, all I have to do is slide it in to the fixed side to where I want it and weld. After the "I" beam is welded I'll be adding on some external pieces to reinforce the splice.

Started laying out a scribe line for the cut and cut one of the holes for a nice radius in the splice.

Screen shot of my CAD drawing showing the fixture and how it works and how I'm making the splice.

 Re: Project EconoTow
The fixture is as imrpessive as the rest of the project! Good job.
Dave C.- Posts : 1268
Join date : 2013-03-23
 Re: Project EconoTow
Beautiful work. The engineering and fabrication going into this truck is nothing but amazing.
Mike R- Posts : 1381
Join date : 2009-08-05
Age : 63
Location : St Paul Mn
 Re: Project EconoTow
You go Pappy !! Awesome work !

dfree383- BBF CONTRIBUTOR

- Posts : 14851
Join date : 2009-07-09
Location : Home Wif Da Wife.....
 Re: Project EconoTow
What's the straight drop axle's built-in camber angle vs something like an early or later model twin I beam?

DILLIGASDAVE- Posts : 2262
Join date : 2009-08-08
Location : Texas. pronounced "texASS"
 Re: Project EconoTow
DILLIGASDAVE wrote:What's the straight drop axle's built-in camber angle vs something like an early or later model twin I beam?
Don't know, but I did consider the twin I beam deal. Way more work than what I'm doing now. Mono I beam is about a simple as it gets.
Page 4 of 9 •  1, 2, 3, 4, 5, 6, 7, 8, 9
Page 4 of 9
Permissions in this forum:
You cannot reply to topics in this forum