My build, my Fox transformation....lotsa pics
+34
Dave De
Jetman
Goblin
jc10000rpm
schmitty
2fox
nitrous.f
D's557BBF
yellowhorse7
cobra tom
Mark Miller
JACKAZZFLATZ
quick 52
dfree383
738drvr
138
72mav
res0rli9
jbozzelle
Lem Evans
bb429power
richter69
the Coug
whatbumper
'65 T-BOLT
GTmustang
nuclearcobra
bbf-falcon
billandlori
IDT-572
bruno
D. Sea
Northwest outlaw
bigblockfox468
38 posters
Page 1 of 7
Page 1 of 7 • 1, 2, 3, 4, 5, 6, 7 
 My build, my Fox transformation....lotsa pics
Towards the end of last year's racing season I decided that I would do a few upgrades  . The 468 with a C-4 trans, 373 gear ran 1/4 mile mid 11:30's @ 117 mph, short times of 1.62-1.66 and high 10:60's @ 125 mph with 1.45 short times on a 100 shot. I made the decision that I wanted to join the 9 second club. Around Sept, maybe Oct I talked with several members from this forum on the phone and then got to meet them in person. I got hooked up with Blake Cartwright and he had a crate block with a rotating assembly for sale, we made a deal, the build is on and has been on for awhile now. Blake is very busy and I told him to "make sure he gets a few of the other brothers engines done, especially his own
  ready for the Bash.....my engine was secondary". I told him my car will not be there this year. If my engine is able to be completed by Bash time I'll show up to get it and be a spectator.
What I can tell you so far on the engine is it is a Ford crate engine block, 4.420 bore, 4.3 stroke, 528 ci in. It has a stock Ford crank pin of 2.500 and a stock rod length of 6.605, the rods are H beams and the crank is a Scat cast steel, sold to Ford for their 514 crate engine. New flat top BRC pistons

and these "A's" that I picked up from Lem

Will give more engine info later as things progress.
The "old" 468 and C-4 were pulled in Feb and sold

I've picked up a few things from time to time. Like this PG that will now do the shifting

Will add updates as time permits and progress happens.
What I can tell you so far on the engine is it is a Ford crate engine block, 4.420 bore, 4.3 stroke, 528 ci in. It has a stock Ford crank pin of 2.500 and a stock rod length of 6.605, the rods are H beams and the crank is a Scat cast steel, sold to Ford for their 514 crate engine. New flat top BRC pistons

and these "A's" that I picked up from Lem

Will give more engine info later as things progress.
The "old" 468 and C-4 were pulled in Feb and sold

I've picked up a few things from time to time. Like this PG that will now do the shifting

Will add updates as time permits and progress happens.
Last edited by bigblockfox468 on June 4th 2010, 6:17 am; edited 5 times in total
bigblockfox468- BBF CONTRIBUTOR

- Posts : 1432
Join date : 2009-02-09
Age : 101
Location : Dryden, MI
 Re: My build, my Fox transformation....lotsa pics
cool deal looking good.

Northwest outlaw- Posts : 962
Join date : 2009-06-27
Age : 48
Location : Pinehurst Idaho

D. Sea- Posts : 2768
Join date : 2008-12-02
Age : 55
Location : Kentucky
 Re: My build, my Fox transformation....lotsa pics
I don't know who built my car but I purchased it from a guy in South Carolina. Once the engine was out I was able to check some things out and was quite surprised by a few things I'll just call "short changed". The headers were bashed in quite badly in some areas for clearance issues.... I imagine  . The headers are Hooker Super Comps with 2 inch primaries. These two tubes were smashed in about half way so they were cut out


and replaced

And they also cut the collectors shorter and welded the exhaust pipe with an H pipe and mufflers directly to the headers. No flanges, no bolts no nothing to disconnect the exhaust from the header .....they just made it one long header
  there again I guess for clearance issues for around the trans and trans cross member.


Overall the headers are still in good shape so rather than buying new I decided to refab them close to factory specs. We'll be welding the collector extensions to the proper length, installing flanges and turn downs after the flanges. Oh yeah I also got an evac system to install in the collector. Once this is done they'll get some hi-temp black paint and I'll post some after pictures.


and replaced

And they also cut the collectors shorter and welded the exhaust pipe with an H pipe and mufflers directly to the headers. No flanges, no bolts no nothing to disconnect the exhaust from the header


Overall the headers are still in good shape so rather than buying new I decided to refab them close to factory specs. We'll be welding the collector extensions to the proper length, installing flanges and turn downs after the flanges. Oh yeah I also got an evac system to install in the collector. Once this is done they'll get some hi-temp black paint and I'll post some after pictures.
Last edited by bigblockfox468 on May 11th 2010, 6:23 pm; edited 1 time in total

bigblockfox468- BBF CONTRIBUTOR

- Posts : 1432
Join date : 2009-02-09
Age : 101
Location : Dryden, MI
 Re: My build, my Fox transformation....lotsa pics
nice job on fixin them up 
_________________
coming soon x275 build .........
thanks to all my sponsors :
www.OakleyMotorsports.com
www.Induction-Solutions.com
www.bfevansraceparts.com
www.ultimateconverter.com
www.keithfulpmotorsports.com
 Re: My build, my Fox transformation....lotsa pics
Your doing a good job Mike............ 
Might as well fix all the problems now, so the won't bite you in the butt later.............
Might as well fix all the problems now, so the won't bite you in the butt later.............

IDT-572- BBF CONTRIBUTOR

- Posts : 4628
Join date : 2008-12-02
Age : 63
Location : Shelbyville Tn.
 Re: My build, my Fox transformation....lotsa pics
About 6 weeks ago I took my car over to my buddy Dominic's place. Dom is a damn good welder fab man and does awesome work. He has a shop called Fab-it and is located in a northern Detriot suburb so if any of you guys from this area need some work Dom is the Man!! It's great to have a friend like that. He's upfront, consciencious on his work and kept it in his mind as if it was he who was paying to have this work done and plus I was learning. After discussing our plan of attack and deciding what to buy such as kits or whatever I will need he said "no kits cause you have to refab them to make work and we'll buy pieces and fab them to work it will be cheaper!!". I was able to find a donor mock up engine "on a rental deal" since I sold my engine and my current build engine is many miles from me somewhere in Tennessee  We started out getting front and mid-plates and welding brackets as needed. The front plate will get profiled trimmed after I put it on the new engine and install the alt and what else on it.


Here is a repair job we did with the body frame area. When the car was put together and the header was bashed they decided to take a cutting torch and blow a hole here for more clearance. The area would be to the right of the top swivel on the steering shaft. Looked real bad

Originally the lower steering shaft swivel was barely on maybe an 1/8 in onto the shaft. You could actually wiggle hard and get it to pull off. So some rework was needed here and also fabbed for more header clearance.

The engine has been installed and removed at least 30 times to check and recheck clearance.
Here is the mid-plate. Notice how it's been trimmed, making engine installation and header installation much, much easier. The mid-plate bolts thread into the bracket, no back up nut needed. I'll lock washer and lock-tite them and keep an eye on them if they do loosen then I can add a back up nut if needed,


Here is a repair job we did with the body frame area. When the car was put together and the header was bashed they decided to take a cutting torch and blow a hole here for more clearance. The area would be to the right of the top swivel on the steering shaft. Looked real bad

Originally the lower steering shaft swivel was barely on maybe an 1/8 in onto the shaft. You could actually wiggle hard and get it to pull off. So some rework was needed here and also fabbed for more header clearance.

The engine has been installed and removed at least 30 times to check and recheck clearance.
Here is the mid-plate. Notice how it's been trimmed, making engine installation and header installation much, much easier. The mid-plate bolts thread into the bracket, no back up nut needed. I'll lock washer and lock-tite them and keep an eye on them if they do loosen then I can add a back up nut if needed,

Last edited by bigblockfox468 on May 11th 2010, 6:26 pm; edited 3 times in total

bigblockfox468- BBF CONTRIBUTOR

- Posts : 1432
Join date : 2009-02-09
Age : 101
Location : Dryden, MI
 Re: My build, my Fox transformation....lotsa pics
I'm using a Moroso Eliminator oil pan.

When the pan was mounted on the block and installed in the engine bay we had a major problem. Prior to the pan install we were just sitting the block in with no pan. The problem we encountered was that valley in between the sumps must be deeper than the pan from the old engine and the engine sat real high with the new pan. The steering rack was the problem and had to be lowered. I talked to a few guys to find out if they had a similiar situation using the Moroso pan and I guess they didn't but was told nothing fits like it's suppose to. So then the cutting torch was fired up and more fab work to boot. The K-member cross tube just below the rack was chopped off and redesigned to allow the rack to come down so we could get the engine down like the old engine used to sit. I guess there are no rules when you're changing things and trying to make it fit. We had to do what we had to do


When the pan was mounted on the block and installed in the engine bay we had a major problem. Prior to the pan install we were just sitting the block in with no pan. The problem we encountered was that valley in between the sumps must be deeper than the pan from the old engine and the engine sat real high with the new pan. The steering rack was the problem and had to be lowered. I talked to a few guys to find out if they had a similiar situation using the Moroso pan and I guess they didn't but was told nothing fits like it's suppose to. So then the cutting torch was fired up and more fab work to boot. The K-member cross tube just below the rack was chopped off and redesigned to allow the rack to come down so we could get the engine down like the old engine used to sit. I guess there are no rules when you're changing things and trying to make it fit. We had to do what we had to do


Last edited by bigblockfox468 on April 30th 2010, 8:40 am; edited 2 times in total

bigblockfox468- BBF CONTRIBUTOR

- Posts : 1432
Join date : 2009-02-09
Age : 101
Location : Dryden, MI
 Re: My build, my Fox transformation....lotsa pics
The K-member top flanges were trimmed to the body frame for more clearance and plus it looks better, oh... also the motor mount perches that used to sit on the K-member for factory mounting were removed too. This really helped in the clearance dept 
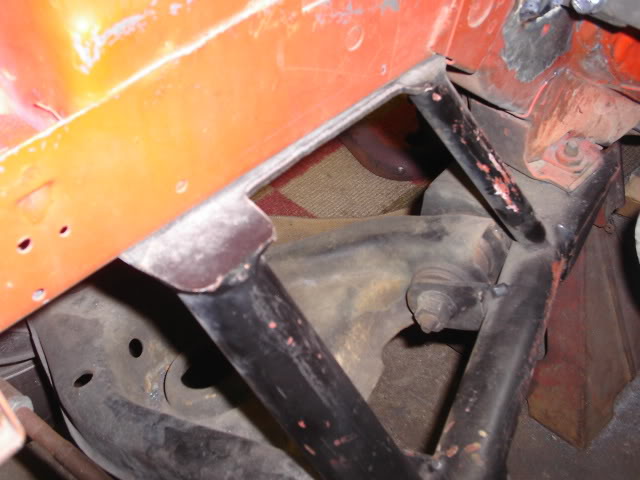

So some things had to be re-tweeked after we found out about the pan situation but it all is fitting real nice now and makes engine installation and header mounting a breeze with the trans connected too. Next job to tackle will be fabbing of the lateral limiter bars. Once those are done I'll get pics posted. I'm kinda concerned of these fitting the same way on the new engine as they will be fitted to the mock up engine. The plan here is a plate will be made and bolted to the motor mount bosses then the bars fasten to the plates. The bars will be adjustable. I just hope Ford kept the same motor boss dimensions the same on their 460 block and the crate engine


So some things had to be re-tweeked after we found out about the pan situation but it all is fitting real nice now and makes engine installation and header mounting a breeze with the trans connected too. Next job to tackle will be fabbing of the lateral limiter bars. Once those are done I'll get pics posted. I'm kinda concerned of these fitting the same way on the new engine as they will be fitted to the mock up engine. The plan here is a plate will be made and bolted to the motor mount bosses then the bars fasten to the plates. The bars will be adjustable. I just hope Ford kept the same motor boss dimensions the same on their 460 block and the crate engine

bigblockfox468- BBF CONTRIBUTOR

- Posts : 1432
Join date : 2009-02-09
Age : 101
Location : Dryden, MI
 Re: My build, my Fox transformation....lotsa pics
looking good job on the headers.

Northwest outlaw- Posts : 962
Join date : 2009-06-27
Age : 48
Location : Pinehurst Idaho
 Re: My build, my Fox transformation....lotsa pics
Here is a pic showing what was done to the one K-member tube running from the front to the rear. The round tube was cut then reboxed a little more square/flat to allow for more left header clearance.


bigblockfox468- BBF CONTRIBUTOR

- Posts : 1432
Join date : 2009-02-09
Age : 101
Location : Dryden, MI
 Re: My build, my Fox transformation....lotsa pics
Here's some shots of the trans cross member and rear mount. You'll see the trans shield is mounted too.....lotsa of clearance 


I had to get a driveshaft 3 inches longer, gave 40 bucks for it, got a new front yoke to fit the PG and new u-joints so I think it'll all be good. Everything fits real nice now. I just hope when I get my new mill in it that everything fits just a nice as it did with the mock up engine. Will add pics and updates when I get em .
.


I had to get a driveshaft 3 inches longer, gave 40 bucks for it, got a new front yoke to fit the PG and new u-joints so I think it'll all be good. Everything fits real nice now. I just hope when I get my new mill in it that everything fits just a nice as it did with the mock up engine. Will add pics and updates when I get em

bigblockfox468- BBF CONTRIBUTOR

- Posts : 1432
Join date : 2009-02-09
Age : 101
Location : Dryden, MI
 Re: My build, my Fox transformation....lotsa pics
Looks good, nice work!!
That sure is a nice clean non-rusty fox your working with there
Bill
That sure is a nice clean non-rusty fox your working with there
Bill

billandlori- Posts : 2081
Join date : 2009-08-06
Age : 55
Location : Stratford, Ontario, Canada
 Re: My build, my Fox transformation....lotsa pics
billandlori wrote:Looks good, nice work!!
That sure is a nice clean non-rusty fox your working with there
Bill
Thanks Bill. The car is very clean. 3 years ago I went down to South Carolina to pick it up. I had a cage installed about 6 months after it had back here and the guy who did the cage was very impressed on how clean it was. He said when he removed the carpet the sheet metal looked new. It's an 85 with an 87 front end.
Last edited by bigblockfox468 on April 30th 2010, 1:51 pm; edited 1 time in total

bigblockfox468- BBF CONTRIBUTOR

- Posts : 1432
Join date : 2009-02-09
Age : 101
Location : Dryden, MI
 Re: My build, my Fox transformation....lotsa pics
Mike,
Since you have a front and mid engine plate, don't bolt the trans down solid. I have a similar crossmember setup and I put the bolts in by hand with a little dab of loctite AND I have a rubber type "bushing" or really it's just neoprene sheet about 1/8" thick, between the crossmember and the trans for a little 'cushion'.
So the crossmember just helps support the back of the trans and doesn't lock it down like a solid mount.
Your friend is a really good fabricator, congrats! It looks GREAT!

D. Sea- Posts : 2768
Join date : 2008-12-02
Age : 55
Location : Kentucky
 Re: My build, my Fox transformation....lotsa pics
Lookin really good Mike,Looks like you are getting yourself ready for some SnakeJelly 
bbf-falcon- Posts : 8995
Join date : 2008-12-03
Location : Jackson, Ohio
 Re: My build, my Fox transformation....lotsa pics
Thanks Damon. On the not tightening of the tranny mounts bolts....is it cause since the engine and tranny are solid mounted I may break a trans case?

bigblockfox468- BBF CONTRIBUTOR

- Posts : 1432
Join date : 2009-02-09
Age : 101
Location : Dryden, MI
 Re: My build, my Fox transformation....lotsa pics
Thanks Rick, maybe next year I'll be able to bring it to the Bash and play too 

bigblockfox468- BBF CONTRIBUTOR

- Posts : 1432
Join date : 2009-02-09
Age : 101
Location : Dryden, MI
 Re: My build, my Fox transformation....lotsa pics
Its because the engine is solid and yes it will break a case or housing.
nuclearcobra- BBF CONTRIBUTOR

- Posts : 1385
Join date : 2009-08-16
Location : Delaware Coast
 Re: My build, my Fox transformation....lotsa pics
Well ...hopefully this is the last time the mock up engine had go in  . Got some more accomplished. Here's some new pics.
It may be kind of hard to see the clearance I'm attempting to show that I have between the body/frame to the headers but believe me there is alot.

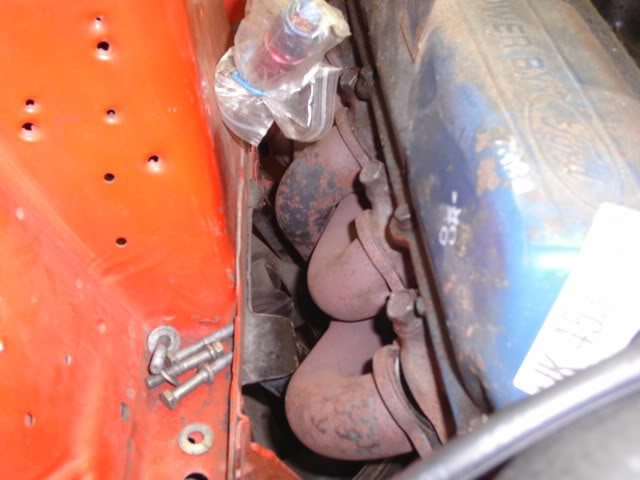
After the engine is in I can actually put the left header on from the bottom. The right header I put between the strut tower the midplate, drop the engine in and pass the removable tubes up, bolt them into place.....piece of cake
It may be kind of hard to see the clearance I'm attempting to show that I have between the body/frame to the headers but believe me there is alot.


After the engine is in I can actually put the left header on from the bottom. The right header I put between the strut tower the midplate, drop the engine in and pass the removable tubes up, bolt them into place.....piece of cake

bigblockfox468- BBF CONTRIBUTOR

- Posts : 1432
Join date : 2009-02-09
Age : 101
Location : Dryden, MI
 Re: My build, my Fox transformation....lotsa pics
The limiter bars we created plus they're adjustable 


bigblockfox468- BBF CONTRIBUTOR

- Posts : 1432
Join date : 2009-02-09
Age : 101
Location : Dryden, MI
 Re: My build, my Fox transformation....lotsa pics
Mike: Look's like your making progress on the chassis and drivetrain. It's all a big can of worms, even when you think you've got everything figured out and then you run into something that won't fit! don't you just love it!
Gary
Gary
GTmustang- BBF CONTRIBUTOR

- Posts : 395
Join date : 2008-12-02
Location : Rogers City, MI
 Re: My build, my Fox transformation....lotsa pics
I hear ya Gary,tell me about it  boy oh boy
  But I'm getting it
 But I'm getting it
bigblockfox468- BBF CONTRIBUTOR

- Posts : 1432
Join date : 2009-02-09
Age : 101
Location : Dryden, MI
 Re: My build, my Fox transformation....lotsa pics
Did a little more work to the headers. Added the collector back to factory length, put some collector flanges on with some turn downs and got the evac bungs installed.


Had to notch my nicely fabbed trans crossmember for pipe clearance but it turned out okay. Cut where needed then boxed it in and added material on top for strength. She's coming along....slow but surely


Had to notch my nicely fabbed trans crossmember for pipe clearance


bigblockfox468- BBF CONTRIBUTOR

- Posts : 1432
Join date : 2009-02-09
Age : 101
Location : Dryden, MI
 Re: My build, my Fox transformation....lotsa pics
Looking good keep up the good work.

Northwest outlaw- Posts : 962
Join date : 2009-06-27
Age : 48
Location : Pinehurst Idaho
Page 1 of 7 • 1, 2, 3, 4, 5, 6, 7 
 Similar topics
» Just some pics of parts for my 557 fox build
» Turbo Mustang build pics
» My build.....not done yet, but damn close! lots of pics!
» Official 1974 F100 dragtruck build thread *pics added*
» Rear Wing fabed up (PICS) MORE PICS ADDED
» Turbo Mustang build pics
» My build.....not done yet, but damn close! lots of pics!
» Official 1974 F100 dragtruck build thread *pics added*
» Rear Wing fabed up (PICS) MORE PICS ADDED
Page 1 of 7
Permissions in this forum:
You cannot reply to topics in this forum